DIY projector from light bulbs. Making a projector using a mobile phone
If you have an old non-working device on your hands, then it is extremely simple to understand its circuit. It is enough to disassemble it and study all the constituent details. If this is not possible, consider a simple device in the photo. The main condition for organizing a home cinema screening is the presence of high-precision elements.
 Some diagrams may differ depending on the type of homemade projector. In the industrial version, a slightly different setting of parts is considered
Thus, a professional projector layout is based on the following details:
- light for translucency (any source can be selected, even a powerful LED);
- condenser lens;
- color wheel or matrix (on modern devices);
- aspherical lens;
- DLP chip;
- lens;
- screen (often multimedia boards are used for such purposes).
The focused light from the bulb and the high-quality matrix (such as can be obtained from any smartphone or tablet) collectively deliver an enlarged image through the lens to a screen mounted on the wall. White sheets, oilcloths and even a light background of furniture or wallpaper can act as such.
 Vintage professional devices have the following scheme, as shown in the photo.
Image quality is achieved by lenses and lamp brightness. Therefore, you should choose a source with a high efficiency. In addition, it is necessary to correlate the size of the screen and the radiation power of the luminous flux. Simply put, the farther the projection is from the light source, the more powerful the light bulb needs to be taken.
Making a projector with your own hands based on a phone
Modern gadgets often have a solid extension through which you can get high-quality video broadcast. On them you can watch any movies on the Internet, as well as self-filmed videos. Let's take a closer look at the stages of manufacturing such a device.

The simplest projector
To make a simple device, you need a minimum of parts. However, you should not count on full-fledged image quality in this case, since most smartphones are not capable of transmitting images in sufficient brightness over a long distance. However, it is a great alternative if there is no projector at all.

What is required for work
For a projector device, you will need a cardboard or wooden box, as well as a smaller cardboard case, in which you need to make a niche for your smartphone. To reduce the reflection of light from the walls of the box, you need to paint it with black. Shoe cream or matte paint is ideal for this. You will also need a lens.

Preparation of all elements
The sequence of operations is as follows.
- We equip the box correctly. To do this, paint the inside of the case with a dark color.
- We put a smaller box in it so that the prepared niche into which the smartphone will be inserted is the size of the screen.
- We direct the open part to the free edge of the second box.
- Prepare a pendant or lens holder, set it on the table, attach an enlarger to it.
- It is allowed to attach it to a cardboard box, having previously cut out a special niche for this.
- To prevent the enlarger from falling, it is fixed with a glue gun.
Assembling the structure
When all the parts are assembled, it remains to assemble them into a single whole. We insert the switched on smartphone into the prepared niche and direct the picture through the lens onto the canvas set as a screen.

Such a cinema projector is convenient to use if you have a remote control that works over Wi-fi, otherwise you have to remove the phone from the box for each switch.
Holographic Projector Manufacturing Process
Holographic projectors are capable of accurately transmitting a picture from any mobile gadget, provided that the maximum brightness is turned on. You can find the parts in your workshop or spend a little money on purchasing several suitable items from the store.

List of materials and tools
To quickly create a 3D projector come in handy:
- cD case;
- glue gun;
- painting or stationery knife;
- pliers;
- smartphone;
- special video with holographic graphics;
- corresponding drawing.
It is important to observe all the dimensions that are prescribed in the drawing, otherwise it will be impossible to achieve the clarity of the image.

Manufacturing of parts for the projector
To create a truncated pyramid, we will use a drawing that will allow us to calculate the dimensions of each part.
Let's consider a step-by-step algorithm:
- Using the drawing, mark four identical sketches on the plastic from the case for the discs, and, using a clerical knife, carefully cut them out.
- We glue all these parts together with a glue gun so that we get a truncated pyramid.
- When notches appear at the ends of the patterns, they are processed with sandpaper.
- We install the smartphone on the top of the pyramid so that the display is centered.
- Put a dark or matte cardboard on top (so that the animation does not mirror).
Likewise, you can use the projector in an upright position. But for this, it will be necessary to make stands holding the smartphone and matte cardboard.

Adjusting the image on a smartphone
For the picture to be fully displayed on a matte surface, you need to make some screen adjustments. Be sure to set the brightness to the maximum level, adjust the color so that it is natural. In this situation, it is advisable to set the automatic contrast mode and the background color to the "Standard" position.

All modern tablets have a ton of features, so you can watch movies and your favorite videos on the big screen through them. The likelihood that the picture will be distorted is minimized, since the screen parameters allow for high-quality image transmission.

What you need to work
In order to prepare an uncomplicated home theater with your own hands, you must have:
- two cardboard boxes of different sizes;
- stationery knife;
- lens with good focusing;
- the tablet;
- pistol glue or PVA;
- black paint.
Manufacturing of structural elements and step by step instructions
To correctly make a video projector with your own hands, we advise you to follow the instructions below.
| Illustration | Action Description |
 | We take the cardboard box. On the side, we circle the lens and cut out a niche for installing the magnifier. |
 | We glue the end of the lens with glue and place it in the cut circle in the box. We paint the inner surface with black paint and let it dry. |
 | We are preparing foam plates that will be inserted inside the box. They will play the role of a tablet stand. The dimensions of the foam should be slightly less than the distance between the walls. |
 | A niche for a tablet is made from one piece of foam. Its dimensions must match the parameters of the gadget. |
 | We glue one part to the other to get such a structure. |
 | We place the tablet inside and turn on the video that we want to watch on it. We direct the lens to a light canvas and enjoy viewing. |

GOOD TO KNOW!
It is important to set the backlight settings on the tablet. For the convenience of switching between clips, you can connect a mouse via a Bluetooth connector. Due to the physics of the lens, the gadget must be installed in an inverted 180º position.

Projector from the slideshow machine
The use of an ordinary magnifier is justified in the manufacture of projectors for amateur watching films. But in order for the picture to be truly high-quality, you can use a special slider that is used in educational institutions. Such an overhead projector is easy to create. To use it, you just need to find a good source of image reproduction.
List of materials for work
The user only has to worry about setting up and correctly installing an already almost finished projector. What is useful for these purposes:
- factory matrix with already configured optical nodes;
- laptop or tablet from which the matrix was removed;

Stages of work
You should try to disassemble your laptop or tablet so that its screen is not damaged. Next, the structure is simply placed in an overhead projector and a slide show or video begins. In such a situation, the screen acts as a navigator through the tablet system. How it looks in practice.
- We connect the inserted matrix to the tablet and find the control device. It can be a special Wi-Fi module or an ordinary wireless computer mouse.
- We connect the projector to the network and direct its lens to the multimedia screen. A special professional board can act as it.
- We play the video and watch it in the darkest possible room.
In order to obtain the maximum image quality, special gobo lenses are installed on the projector.

When creating a projector, everyone thought about its future purpose. It is from this factor that one should start when choosing the dimensions of a multimedia device. Check out some helpful user recommendations.
- If you plan to often watch movies in the twilight and do it with the whole family, you no longer need a cinema. The only condition is to use not a tablet or a phone, but a larger design, as an option, a laptop.
- For the construction of the projector case, it is better to use materials of decent quality, for example, plywood or MDF. Be sure to make sure that the device is stable.
- If you need to broadcast video to a screen located high, it is better to immediately provide for a stand. Do not try to place books or other objects under the device. Observance of angular radiation is required.
Dear readers, if you have experience of such operations, be sure to share your ideas.
If in the process of reading you have any questions, ask them in the comments under the article. We are always glad to receive feedback, so we will give you an answer quickly.
From this manual you will learn how to make a projector with your own hands out of a box and a magnifying glass with a resolution of 2K (2560x1440).


Many of the parts used in the project can be purchased from Chinese online stores.
To purchase the necessary spare parts for your homemade projector, use the services of the stores "Aliexpress.com" and "Taobao.com".
What is required.
- Liquid crystal screen and HDMI board for it: 5.98 inches diagonal and 2560x1440 resolution: on the topfoison website (costs about $ 200); you can use another 2K LCD you have. By the way, you don't need a backlight module.
- Body: black, laser-cut (cost about $ 100). At the end of this chapter, there is a zip file with AutoCad drawings of the projector body.
- Fresnel lenses: one with a focal length of 120 mm, the other 185 mm. F120 mounts between LED and LCD, F185 mounts between LCD and projection lens ($ 50 on Aliexpress.com).
- Projection lens: F190 or F200 (also sold on Aliexpress.com and costs less than $ 50).
LED (one of two):
- Conventional: 150 Watt LED (Taobao.com) with heat sink. Alternatively, a 128-watt one from aliexpress.com (about $ 57). You will need a suitable driver for the LED. It is not recommended to use cheap LEDs as this can blur the edges and corners.
- Unusual: Luminus Devices' CBT-140 LED is used in a medical endoscope. Sold with driver on Aliexpress.com for $ 185: more expensive, but worth it. Here is a link to the 100 watt. It is not as bright, but suitable for a dark room.
- Condenser Lens: Square, sold on Tabao.com and also on aliexpress.com (about $ 25). You can also use a regular round lens. Square gives the best brightness, but the right and left edges are slightly yellow.
- Extras: some cooling fans, power supplies, USB cable, distribution wires and your golden hands.
Building such a projector will cost you less than $ 1000, which is cheaper than buying a factory-made device of this class.
Design flaws:
- If you use method number 1 (normal) in this project, then you will not be able to get a perfectly clear image. If you use method # 2 (unusual), you will get excellent focus and can see each of the more than 3 million points.
- The brightness is too low compared to commercial products. Smartphone LCD is used: This kind of display has low transparency. At night in the dark the image will be bright enough for comfortable viewing, but during the day it will be difficult to see. If you have a dark room, then you can fully enjoy your favorite movies and games.
Step 1: check the LCD and design the case


Show 5 more images


Before we move on to assembling the case, let's check the LCD display. The display must be assembled with a dedicated HDMI card.
For convenience, also order an FPC extension cable and display connection board. Because We will not use the screen backlight, then when checking the display, you need to press and hold the backlight connector.
After checking the LCD, let's move on to designing the case. You can skip the next step if you decide to use the drawings of the attached file.
Step 2: make the housing and mount for the Fresnel lenses


Show 7 more images


- We make the case. Make parts according to AutoCad drawings. Assemble the body from parts using glue. Do not glue the top cover: it will be fixed with screws.
- We make a mount for Fresnel lenses. They will be located inside the projector cabinet.
The Fresnel lenses are installed in the holder, and then the holder itself will fit into the LCD holder.
When manufacturing the holder, you must exclude the reflection of the beam from its surfaces, otherwise the reflected light will degrade the image quality. To prevent this undesirable effect, surfaces from which the beam can be reflected must be sandpaper to a matt finish.
Step 3: making a mount for the LCD screen


This step is the most important.
A small display has a very small inactive area (frame), so it is difficult to prevent light from leaking out when making an LCD holder.
The AutoCad file contains a drawing of the display holder, designed to prevent light leakage and ensure good image quality.
If you neglect to make a quality mount, you will end up with an image with horrible white vertical and / or horizontal stripes around the edges, as shown in the photo.
The drawing file, among other things, contains three parts of the display holder.
Two parts are for permanently attaching the LCD and one is for temporary.
Be careful not to touch the screen with your hands when using the LCD monitor to avoid leaving fingerprints on it. Wear nitrile medical gloves when working.
Step 4: fix the LED to the heatsink and make a holder for the LED


Show 3 more images


Regardless of which LED you choose: conventional or medical (CBT-140), the method of attaching it to the heatsink is the same.
Screw the LED to the heatsink with the M3 screws. Don't forget to add thermal paste between the LED and the heatsink first.
Then place the condenser lens correctly in front of the LED. Usually a mount is included with it.
Step 5: do the wiring and install the cooling fans


Show 6 more images


Optionally, you can include a speed controller in the fan supply circuit.
The main connections are as follows:
- AC voltage is supplied to the power supplies for the LED, fans, and HDMI (USB) board.
- The power supply converts AC to DC.
- The power supply is connected to the LED and cooling fans. You can use separate power supplies for the LED and fans.
- The USB power supply will connect to the HDMI board.
- Install two separate switches, one for turning the LED and LCD on / off, and one for the fans. This will allow, after turning off the LED, for some time to cool the inside of the device case.
Install some fans to cool the LCD.
The LCD is installed next to the LED (at a distance of about 110-130 mm). The LED generates a lot of thermal energy and black spots will appear on the display if the display is not cooled enough.
Without sufficient cooling, the LCD will fail. For cooling, you can install several different-sized fans. The photographs show the direction of air movement in the projector cabinet with red arrows.
Step 6: check the location of the LED and optics


Once you figure out how to connect the wires, check the LED.
With the correct distance between the LED and the rear Fresnel lens (F120), the light from the LED will illuminate the entire active area of \u200b\u200bthe LCD.
When installing Fresnel lenses, the grooved sides of both lenses should face towards the display.
There are many different combinations. In our project we use F120 / F185 Fresnel lenses with F190 projection lens. There are other combinations that would work for this project.
The combination we have chosen for the 6 "LCD will be optimal. You can choose a combination of lenses with a long focal length (for example, F120 / F220 Fresnel lenses with F230 projection lens).
The shorter the focal length, the larger the image size will be.
With this combination of lenses and the CBT-140 LED, you can distinguish between pixels on the screen. Focus quality will be better than many of these factory-built projectors.
Use the Rule of Thumb to determine the correct distance between the lenses. experimentally.
This means you will need to find the correct lens spacing through trial and error.
There are several rules, following which it will be easier for you to set up the LED projector:
- The distance between LCD and Fresnel lens should be within 15-20mm. If it is too small, the LCD will be damaged due to the high temperature exposure from the LED. If the distance is too large, the image will be blurry.
- The distance between the rear Fresnel lens (F120) and the LED should be 90% of the focal length of the lens. Move the lens +/- 10% of the focal length of the F120 lens and find the best image quality.
- The distance between the projection lens (rear side of the triplet) and the front Fresnel lens (F185) should be equal to the focal length of the projection lens (in our case, it is 190 mm). Focus is adjusted by moving the projection lens forward or backward.
The image quality will be the better, the smaller the LED radiation area.
For this reason, don't skimp on the LED. Purchase CBT-140 as available, it has the smallest light emission area.
Step 7: have fun


Your LED home projector is ready!
Install your LED video projector, plug it in and enjoy viewing at home.
A diode projector is perfect for watching YouTube videos.
In this article, which continues our cycle of various simple home crafts, we will tell you how to make a simple, but adequately working projector at home on your own. A home-made device that can be easily made at home even without special skills can replace a small home theater for watching movies or family photos.
Of course, the factory assembly wins in quality, but in matters of comfort and atmosphere, a homemade projector will be much better. Moreover, it can be done together with the child - this is a very serious plus to your relationship.

Even a child himself will not have any difficulties in assembling a projector from an ordinary cardboard box and a banal magnifier if he decides to work on the device without the help of adults. In time it will take a maximum of 15 minutes.

We will now tell you step by step how best to make such a projector with a minimum investment of time and effort. There are simple and complex schemes, we will analyze one that is as easy as possible in practical implementation.


Preparing to create a projector
To begin with, we will collect in front of us all those materials and components from which it will be possible to make our own miracle projector.
We will definitely need an ordinary medium-sized shoebox, a 10X zoom lens, a stationery sharp knife, an ordinary pencil for marking, black electrical tape, a paper clip and, of course, a smartphone. A homemade projector for viewing photos and videos will be ready very soon.

Carefully cut a hole exactly in the center on one of the side walls of the box, in which the lens will be placed. It is very important that it is located strictly in the center - here we will need a pencil, with which we will draw diagonals on the side where we will cut the hole. It is in the center of the intersection of the diagonals that the lens will be placed.

We fix the lens with the previously supplied electrical tape. However, other fixing options are also suitable, such as building glue or silicone.

Inside the box we make a stand for placing the smartphone (if there is a special case that allows you to put the smartphone behind the lens, then no stand is simply needed).

We turn off the lights, hang the curtains and start testing the projector. You just need to move the smartphone to find its optimal position relative to the lens. It is necessary to achieve the highest quality image - everything is simple here and depends only on the position of the device and the box.

A normally working image flipping application must be downloaded and installed on your phone. The fact is that when passing through the lens, the video or photo will automatically flip 180 degrees.


The best option for Android OS will be Ultimate Rotation Control, and owners of Apple devices will be able to use Video Rotate & Flip or another option.

It is advisable to make a convenient input for the MicroUSB cable - the phones are quickly discharged when playing videos or viewing photos.

As you can see, there is nothing complicated in making a simple home projector. The more pleasant moment will be that you will have to spend the minimum amount of money - after all, everything you need for him can be found in almost any apartment.

What points should be considered when working?
If you decide to make a really good projector, then you should increase all the dimensions. Accordingly, instead of a phone, use a tablet or laptop, and the box will accordingly also be larger. The manufacturing mechanics are exactly the same as in the small format.

IMPORTANT: If the image does not get better, no matter how you move the device, then most likely it is the quality of the lens that you installed. It will be optimal if you find an old Soviet magnifier - their quality is simply amazing.


The brightness settings on a smartphone or tablet should be set to the maximum possible. Painting the inside of the box black will also improve the quality of the projected image well. The wall is also not suitable for any - it will be best if the projection goes to the Whatman paper placed on the wall evenly and at a right angle.


Be sure to organize viewing only in the dark and with minimal ambient light - only in such conditions the picture quality will be more or less normal.

Do not forget that this is a homemade product, not a professional technique - do not expect too much from it. Homemade projectors with lens, no magnifier can also work fine.

We are sure that our ideas and detailed instructions for creating a home projector have been useful to you. Working together with your child on such a device will help you establish additional contact with him, and cozy family evenings will be great activities for relaxation after a hard day at work. Make a projector and be sure that everything will work out for you.

DIY photo projectors


A projection apparatus (in everyday life - a projector) is an optical-mechanical device with the help of which an image from flat illuminated objects is projected onto the screen. Its structure depends on the purpose for which the device is intended (viewing normal slides or video content in high resolution), and the image projection technology used. However, the design of the simplest samples does not differ in increased complexity. Therefore, in order to get a kind of home theater, it is quite possible to assemble a projector with your own hands. And how to do this is described in the material below.
How multimedia projectors work
More recently, in the domestic market, one could find projectors using light for projection:
- passing through a transparent object (slides, films) - overhead projectors (diascopes);
- reflected from an opaque object (book page, etc.) - epiprojectors (bishops);

- passing through constantly moving frames on transparent film - cinema projectors.
There were also universal models with which it was possible to project an image onto the screen from both opaque and transparent objects. They are called epidiaprojectors (epidiascopes). However, with the development of digital technologies, these projectors have been replaced by multimedia projection devices that successfully compete in the market with modern Smart TVs in the home theater segment.
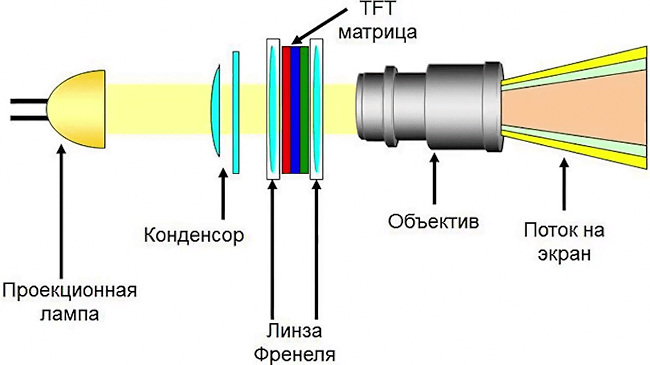
A modern multimedia projector is a small set-top box that can be used to reproduce on a large screen an image received from various digital devices (camcorder, DVD-player, USB-media, etc.). Today, there are two types of multimedia projectors, the work of which is based on the use of different digital technologies. The image in them is obtained by means of a luminous flux:
- reflected through color filters from a matrix of controlled microscopic mirrors - DLP (DMD) technology;
- passing through a transparent matrix of liquid crystal elements - LCD technology.

Structurally, multimedia projectors are quite complex devices in which optical, electronic and mechanical units operate synchronouslywith high-precision technical parameters.
On a note! DLP projectors (DMD) provide high contrast images with optimal color reproduction, while LCD projectors are distinguished by high brightness and color saturation.
How to assemble a projector yourself
Building a high quality multimedia projection device at home is almost impossible. At the same time, it is quite within the power of a person who has basic knowledge in the field of electronics and the skills to carry out electrical work to assemble a projector of the simplest design with his own hands.
Before you start assembling your home projector, you must decide how exactly it will be used... For example, if:
- with the help of the projector, cartoons for the child will be demonstrated, then you can make the simplest mini-projector even from a phone;
- you need to get color effects when listening to music tracks (color music), then you need a homemade laser projector;
- if there is a desire to surprise loved ones with something unusual, then you can make a simple holographic projector yourself.
The simplest projector
The simplest video projector you can make is a smartphone and a lens capable of 10x magnification. To do this, you should additionally prepare a box of solid cardboard, and from the tools you will need:
- stationery knife;
- pencil of the "Constructor" type with a hardness of 2M;
- electrical tape, silicone glue or glue gun;
- large paperclip.

Important! When the light flux passes through the lens, the image is flipped 180 °. Therefore, a special application must be downloaded to a mobile device, which allows you to flip the image on its screen. For example, for cell phones running Android OS, the Ultimate Rotation Control application is most often installed.
Manufacturing of parts and assembly of a projector from a box and a magnifying glass is carried out in the following order.

Advice! It is advisable to make a hole on the back of the box for connecting cables from the charger and a USB adapter, with which you can connect a flash memory to the smartphone.
A simple 3D projection device can be made from a mobile phone and a truncated plastic pyramid with dimensions:
- base, mm - 60x60;
- small (truncated) square, mm - 10x10;
- height, mm - 45.

The 3D projector is based on the construction described above. Now, if you upload special holographic video tracks to the memory of your mobile device, place an inverted pyramid in the center of its display and turn on the playback of recorded videos, then the resulting image can surprise the audience. This is especially true for older people.
Slide-based projection apparatus
A high-quality image can be obtained without a magnifying glass. In this case, to create a homemade device, you will need an overhead projector for slides that are projected from a sheet of white paper measuring 210x297 mm (A4 format). The advantage of this projector is that all optical units are assembled and adjusted at the factory, and the user only has to worry about finding the source of the image.

Best of all, the matrix from the 10.1 tablet (217x136 mm) will cope with the broadcast of photo or video content. True, for this it will need to be carefully dismantled from the case, without disrupting the performance of the gadget. Having installed the matrix in the projector, it is connected to the tablet, which in this case acts as an image source, and the overhead projector is turned on. The best image is obtained if use an overhead projector, translucent slide (in our case, the matrix). If an overhead projector uses a reflected beam of light to project an image, the picture quality will be noticeably worse.
You can make a similar projector based on an overhead projector for viewing smaller slides. To do this, you need a matrix from a phone or an MP video player, which are placed in the slide window.

Gobo projection
To obtain original moving pictures, the overhead projector instead of a matrix, they are equipped with sets of special gobo lenses, which are easy to make with your own hands. In this case, a projector from a filmoscope can be used as a light source. This option (gobo projection) is most often used for various kinds of presentations.
Note: a gobo lens is a projection filter (stencil, frame) that is installed in front of the light source.
Home theater projector
Quite often, movie lovers are scared off by high prices for a set of equipment that is necessary for organizing a home theater. In this case, you can try to make a fairly good projector yourself, based on a powerful LED and LCD matrix from a computer monitor or laptop... This business is far from simple and requires engineering knowledge in the field of optical instrumentation. We'll have to develop drawings of the necessary parts at home, adjust the optical blocks, etc.
In addition, you will need a number of components, including:
- fresnel lens with a focal length of 220 mm;
- fresnel lens with a focal length of 317 mm;
- lens 80mm / 1: 4 / FR \u003d 320;
- intermediate lenses (condenser);
- 2 fans with power and control units;
- lED with a power of at least 100 W with a radiator and a driver;
- LCD matrix with a size of at least 15 ″ and a resolution of at least 1024x768;
- remote control of the monitor (via Wi-Fi).

Drawings of body parts for such a projector will have to be developed independently and ordered to be manufactured on the side, or also, using their own abilities and skills. The installation of components in the assembled case should be carried out in accordance with the given diagram in such a way that the light is evenly distributed over the screen.
Attention! All distances between the optical elements of the projector are determined empirically.

For people who have sufficient skills, backed up by knowledge, and are going to make a projector on their own at home, there are a number of recommendations from masters who have experience in such production.

On numerous sites of the Internet community, a large number of a wide variety of structures made from scrap materials (which can be easily found in any home) are given with instructions and reviews from people who have used the advice. Well, everyone determines the feasibility and economic feasibility of such crafts independently, based on their own capabilities and skills.
In conclusion, you should pay attention that a carefully assembled and correctly adjusted projector will allow you to get a sufficiently high-quality image on a screen located at a distance of 4 meters from the device. In this case, the diagonal of the frame at the output will be 100 ″. This is a perfectly acceptable solution, if not for watching videos in maximum resolution, then at least for spending time together with your family while watching an interesting movie.
Popular projectors of 2018
Epson EB-X41 projector on Yandex Market
Epson EH-TW5400 projector on Yandex Market
Acer X118 projector on Yandex Market
XGIMI H2 projector on Yandex Market
BenQ TH534 projector on Yandex Market
A long time ago I had an idea to assemble a video projector from an LCD monitor. As it turned out, this topic is widespread on the Internet on many sites. This was especially true when industrial projectors were very expensive. The principle of operation of such a projector is similar to any projector for projecting transparent images: a photographic enlarger, a filmoscope, etc. Here, the matrix of the LCD monitor serves as the projection object. Digging for a long time on the Internet, I stopped at the TWIPI website. There you can order the necessary accessories for assembling the projector. First of all, this is a set of optics: two large flat Fresnel lenses and a lens. In Livny I bought a used monitor 15 "LG 1515 1024 by 768. Also, I bought the necessary powerful 400W metal halide lamp with an IZU and a choke. Everything else - wooden blanks, plywood sheets, screws, coolers for cooling the matrix, etc. - Below are the photos of the projector. The links are taken from my page of the site "My World". There you can also download the same photos in the original size. I think that a detailed description of the design process will be superfluous. The preliminary drawing of the projector in real dimensions was done in the program SPlan. I didn't bother with 3DMax. On one side there are connectors for power supply and SVGA video source. On the other side there is a triple switch for turning on the cooling system, matrix and lamp. There are also duplicated monitor buttons. The front wall is made movable to adjust the sharpness, depending on the distance from the projector to the screen. The image is crisp, but there are a number of minor drawbacks. First, there is no way to adjust the screen geometry. Secondly, the projection angle is large: the resulting diagonal of the screen is approximately equal to the distance from it to the projector. Also, the brightness of the image is not very high, but sufficient (that is, the image becomes acceptable only in complete darkness). There are also very slight blackouts in the corners (about 3% of the area), especially if the projector is operated at a short distance from the screen. All this is caused by the difficulty of illuminating a fairly large area, and even not quite transparent matrix, compared to an industrial projector. This explains the use of a very bright lamp (38,000 lm).


