Crafts from paper sheet. Interesting paper crafts do it yourself
Useful advice
You do not need to have a special gift to do something beautiful and unusual. If you know some tricks, then you can make a beautifuldecoration For home or gift, making a minimum of effort and using very few materials.
On our site you will also find:
Here is just a small part of simple crafts that absolutely anyone can do:
Simple crafts do it yourself
1. Autumn candles

You will need:
Leaves (real or artificial)
PVA glue (glue for decoupage)
Tassel or sponge

* Wipe the jar with alcohol to get rid of fats.
* Apply glue on the bank.
* Use straight leaves to decorate the jar.

* Clever for decoupage can lubricate the glued leaves.
* Add for beauty thread and candle.

2. Colored Cup

You will need:
Oil markers
Scissors

* From the cardboard cut the stencil of any drawing or letters.
* Attach stencils to the cup and start to apply around it a different color markers.


Just do it yourself
3. Colored jars

You will need:
Alcohol (for cleaning cans)
Acrylic paints
Decorations (Flowers)

* Clean the bank with alcohol.
* Paint the jar in any color and leave to dry.
* You can add to the marker (in this case, the Relph is applied on the bank, which is erased).
* Insert flowers in the vase.

4. Colored sneakers

You will need:
Fabric markers
White (light) sneakers
Pencil

* Pencil draw the desired drawing on the kids.

* Circle the marker drawing and start coloring how you like more.

The most simple crafts
5. Crafts from wine traffic jams

You will need:
Wine plugs
Pencil
Super glue
* Draw on paper to any simple form - in this example it is a heart shape.

* Start gluing the plugs to each other (apply glue only on the sides, do not apply on the ends to not stick them to paper), putting them to the drawing to get the heart as a result.

6. Infinity scarf from old T-shirt


You will need:
Old / Unnecessary T-shirt
Scissors
Thread and needle (sewing machine)
* Cut from T-shirt Left and right edges (see image). The width of the T-shirt after this will be 35 cm.

* Cut a small one from below and from above (where the neck).

* Sure both halves from the inside, and you will have a scarf.

Easy and just do it yourself
7. Bright vases from glass bottles

You will need:
Watercolor paints
Bottles
Bowl and brush (if necessary)
Syringe (if necessary)
* Pour some paint in a bowl. You can mix multiple paints to get another color.

* Pour the paint into the bottle. It is more convenient to do it with a syringe - you dial in the syringe paint, and inject it later into the bottle.

* Turn the bottle to the paint cover all the glass inside.

* Turn over the bottle and leave in this position in the sink - excess paint deposition.

* When the paint is driving, you can add water to a vase and insert flowers into it.


8. Towel dryer
If you have an old staircase, you can it is cleaned, if necessary, handle emery paper and even paint. After that, it can be put in the bathroom to hang the towels.

Simple paper crafts
9. Garland of paper cups

You will need:
Paper cups
Normal garland
Knife or scissors.

* In each cup, make a cross-shaped incision.
* Insert into each hole in the light bulb from the garland.
* Decorate the garland room.
10. Golden Canvas
Even if you do not know how to draw at all, you can make a very beautiful project and decorate them the interior.

You will need:
2 White Canvas
Golden, Blue and Orange Acrylic Paint
Brush-sponge
* Paint each canvas 2-3 layers of gold paint - after each layer, give the paint to dry.
* With brush sponge, start painting canvases. One will be blue, and another orange. Make some lines shorter, others are longer.
11. Multicolored keys
If you have a few identical keys from different locks, use nail polish to paint them. Thus, you will know which key from which castle.

Crafts from simple materials
12. Colored candlesticks

You will need:
Wide glass and a narrow glass (or vases of different sizes)
Super glue
Food coloring
* Put a small glass into a large, and fasten both glue - apply glue to the bottom of a small glass.
* Pour water into the gap between the glasses and add the food dye.
* Put the candle inside the small glass.
13. Vase from the light bulb

You will need:
Light bulb
Pliers
Screwdriver
Wire (if necessary)
Cover for the base of the vase (if necessary)
Super glue
Gloves and specials. Glasses (to protect hands and eyes)

* Pliers remove the tip of the light bulb.
* Remove the glass with a screwdriver or pliers at the base. You may have to get rid of several layers of glass - be careful and attentive.
* Stick light bulb (plastic lid).
* Light bulb can also be hung - to do this, use the wire.
* You can complicate the task and add a LED light bulb. For this, except the light bulb, you will need small batteries. All instructions can be seen in the video:
Simple crafts for children
14. Drawing of ghosts on a T-shirt

You will need:
Wide adhesive tape
Light T-shirt
Scissors
* From the adhesive tape cut the details of your ghost (eyes and mouth, for example)

* Stick all the details neatly to the T-shirt.

15. Congratulations from the keyboard
Such a congratulation is very easy to do.

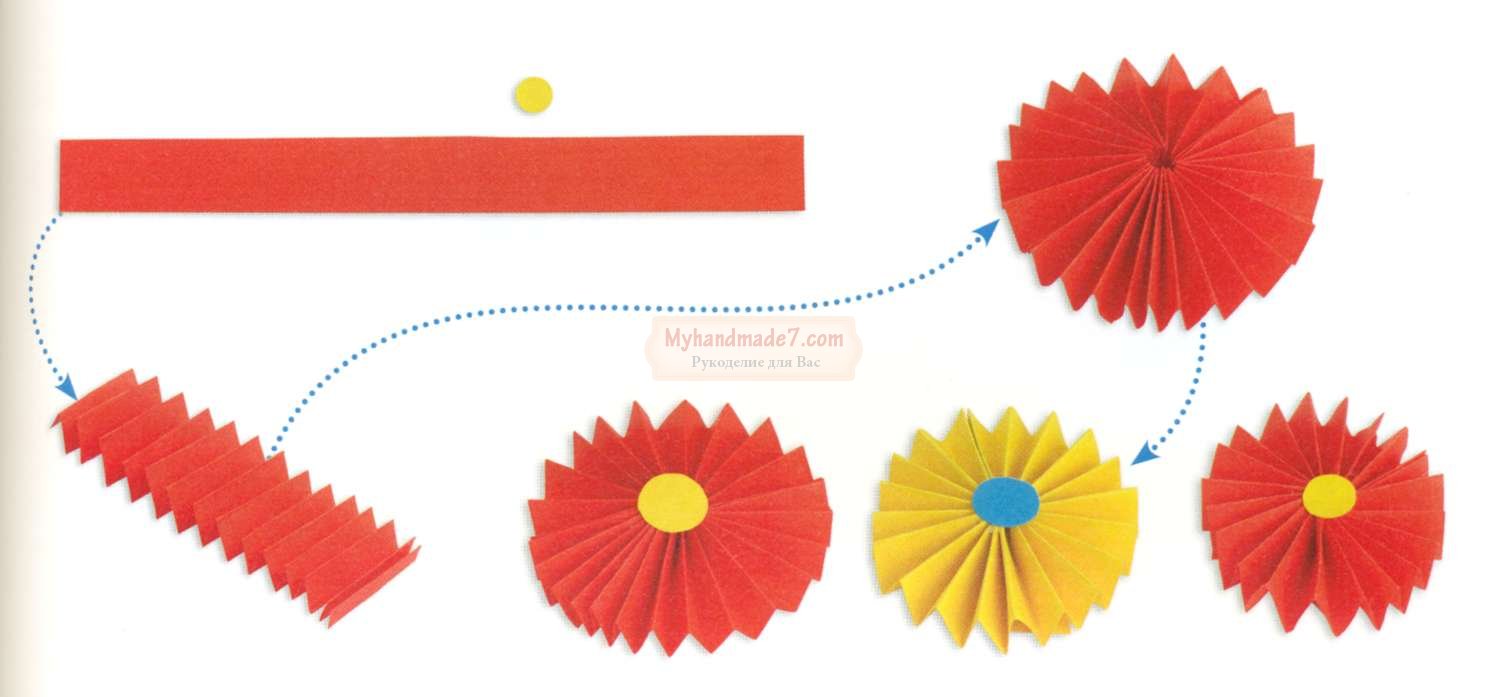
Outside the windows autumn, and sometimes I want to return to the summer. Create a sense of summer day will help sunflowers - daisies. You need not so many materials: paper yellow and white, the most ordinary pencil, mandatory glue, as well as a circular or minor coins.
The process of creating a chamomile
We take several lanes of paper, namely nine pieces. They must be the same in size. From yellow paper with a circulation (coins), cut out two small circles. Create petals, gluing strips. With the help of glue Brepim to yellow mugs - chamomile is ready.

At a small age, children often love to hooligan and draw on the walls. In schoolchildren, thrust for creativity is combined with mischief and disobedience. Want to send the baby's energy to the right direction? Give him the opportunity to decorate the room itself. The next master class will be useful to mothers who have small daughters.

Garland from butterflies
Such garlands are not as complicated, as it seems. On the Internet you can download the stencil of the butterfly or draw it from hand. Paper can be selected color or for scrapbooking. Here is the choice for you.

As materials you need threads (ribbon), scissors and glue, pencil.

Master class on garland
- Cut the butterfly. You can already from printed samples. Or draw butterfly yourself, if you are confident in your artistic skills. But then it is worth folding the sheet in half and draw only half the drawing to observe the symmetry. As a result, it will turn out the same pattern.
- Then we supply a sample of the butterfly on paper and create a lot of copies. By contour, we carefully cut out future elements of the decoration for the garland.
- We fasten with the glue of two butterflies, create 3 D effect.
- Glue all butterflies on a tape or on a thread. Our festive garland is ready.

Merry monsters as bookmarks
Most kids have a favorite book of fairy tales. Why not create colorful and original bookmarks in the form of monsters? We will share another interesting master class, which will delight and the child and parents!

Materials for craft
You will need samples of monster (templates can be downloaded from the Internet) scissors, glue, colored markers, various beads or buttons.

Create monster!
- We take printouts of fantastic little animals or fabulous monster.
- Cut and bend in the corners, following the printout template
- With the help of glue, we combine the connecting ends
- Decorate the bookmark using fantasy and your own taste. Sequins, rhinestones - all that your heart
- Original and bright bookmark ready!

Origami - Fox: Easy and beautiful
Another kind of paper crafts is quite popular in our time, origami. Believe me nothing complicated, because Origami is literally translated from the Japanese as folded of paper.

In our master class we will analyze how to make a fox. This is a nice and cunning animal from fairy tales will have to do with any little fidget.

Materials: Colored Paper, Felt Packs (Paints)

Procedure:
- Fold a sheet of paper in half
- Then fold on the dotted line
- The resulting triangular ends fold together
- Deploy
- With the help of felt-meter or paint draw eyes and the nose of fox.
- Funny animal is ready!
- Also in the Origami technique you can create a fun puppy. Interested? Let's show and tell the detailed master class.

Create a puppy
Materials: Colored paper, glue, pencils, markers of different colors.

Master Class
- Take the paper brown colors and cut the square
- Square fold in half (diagonally)
- Then the leafle should still be folded in half. It is recommended to do it easily. Thus, we plan a middle line. This is necessary for the symmetry of the puppy's face.
- Generate down the upper corners of the resulting triangle. It will be a puppy ears
- You can only get up the bottom corner of the triangle to finish the face of the future craft
- Draw your nose and eyes to our puppy! Another hand is ready!

Bunnies from paper
Another cute and funny craft is bunnies from paper. The creation process is so simple that crafts can even make kids of four or five years.

Materials: glue, white paper, markers, scissors

Master Class
- to begin with, cut out several paper strips, which should be the same in width.
- To create a scare head, just connect the strip in the circle and glue the ends
- The ears are glued separately
- Paws create as follows. On the strip from which we will do torso, we make small cuts on both sides
- Bunkers can be issued. Stick them on green paper, creating thus clearing.

As you can see crafts from paper a huge amount. Do it exciting and informative. Below we offer to get acquainted with the photo collection of beautiful photos of ideas!
Today we will learn to do interesting and original crafts from paper Together with children or for children.
And for a start, let's see what we need to do this:
To create crafts, we will use different types of paper and cardboard:
napkins for decoupage on the boxes;
newspaper for creating balloons from papier-mache;
old magazines for crafts with beads;
fastener and wrapping paper;
color bilateral paper;
corrugated and ordinary cardboard;
paper plates, cardboard tubes, various boxes and more.
For creativity, the child will need such basic materials and tools like scissors, glue, paints and markers.
You have so much that many small right items are going, and put them nowhere? Let's make funny pockets, which will fit and which can be hung on a prominent place.
Paper crafts for children: useful pockets
What will take:
colored paper
pencil
lace scissors glue
Sequence of work:
Draw the contour of the face of the animal, such as a bear.
Cut the contour two such figures. Make details for ears and spout, as shown in the photo.

Apply glue around the edge, connect the details so that the pockets turn out inside. Make a hole for two holes.

The covers of the ears and spout. Tightening a ribbon for which you can hang.

Such pockets are perfect for storing small things: hairpins, calculation or stationery.

Paper crafts for children: racing race
Do you know that you can make unusual racing cars with your own hands? Let's create them and arrange a real check in. Interestingly, the car under what number will win?
What will take:
cardboard Paint Tubes, Felt Tops
colored paper cardboard
scissors glue
Sequence of work:
Coloring the tube in bright colors.

Cut out from colored and white paper parts for machines (for wheels it is better to take a black cardboard - then your "car" will be firmly standing). Feltaster Dorisuy what is needed.

Make a hole in the tube, as shown in the picture (you can ask for an adult to help).

Now covered all the details. Wait until it gets up, - and forward, play!

Paper crafts for children: Paper-Masha Balloons
Who does not dream of flying in a balloon? Someday you will definitely do it. Now let's try to make an unusual balloon from an ordinary newspaper.
What will take:
glue Sharik.
needle needles
cream paint.
Sequence of work:
Again the ball, lining it with any cream. Prepare a newspaper for crafts - for this you need to break it into small pieces. Wetting them in the water, skiing the ball so that there is no lumen.

Now apply the glue layer on the ball and crossing the pieces of newspapers in the water - it is necessary to make 2-3 layers. You may need an adult help.

When the ball is completely dry (for this you will need to wait 1-2 days), the needle with a needle - he now does not need a chalk, as shown in the photo.

Now paint the ball with paints.

Now make a basket. To do this, the newspaper sheet is divided into 4 parts so that the billets of the rectangular shape are obtained. Then, starting from the bottom angle, the needker to roll the newspaper into the tube, and the tip of the boil.

Take 5 tubes and put them near, and the sixth stretch is across the first, above the second, under the third, etc., alternating. The next tube must be proper on the contrary: what was at the bottom will be on top.

To secure our foundation, take one tube and penetrate around, as passing it between other tubes through one.

Now you can make the basket itself: for this, you will bend all the ends upstairs and begin to weave them around the same way as you did before. Complete 4 rows.

Unnecessary ends of penetration from above and shock, some can just trim. Pick up a gouache basket.

Make holes at the bottom of the ball and with the help of a thread fix the basket. The balloon is ready!

Cheerful animals
It turns out, you can quickly and easily make yourself a striped friend. And to be able to play with friends, let's find out how to make not only a tiger, but also other animals.
What will take:
colored paper
scissors glue
Sequence of work:
Take a sheet of colored paper and lay, as shown in the figure. Square ends to get a strip.

Sogns striped "accordion" in three places to get the letter "M".

Cut out of colored paper blanks for an animal.

Boots on the basis. Ready! You got a tiger.

Home Theater.
And what if you arrange a real theater at home? It will be possible to invite adults to the performance and show them some fairy tale, such as "Kolobok". I think they will define your skills!
What will take:
colored paper Circle Scissors Glue
feltolsters chopstick
Sequence of work:
Draw on a sheet of colored paper a blank, as shown in the photo.

Cut out the workpiece and splashes.

Cut out of colored paper Foundation for an animal
Basic fittings. Look who happened

Take the basis of your favorite fairy tale with animals and make all the characters from the paper. If you stick to the billets of the stick, it will be possible to show the performance due to the screen, as in the puppet theater.
Paper crafts for children: Funny caterpies and spiders
Have you ever seen a real spider? And caterpillar? Let's make out of a cardboard box from the eggs of funny animals with shaggy legs. They will look like real!
What will take:
cardboard box from under eggs
scissors glue
colored paper
wire
Sequence of work:
Cut out from the cardboard box of the workpiece: three cells for caterpillars, for bugs and spiders - one.

Pick up the gouache of the workpiece.

Prepare details for animals: eyes cut out of colored paper, make legs from fluffy wire.
Make holes in blanks and sleep legs. Then the winding eyes.

Try to make them in the same way.

Amazing masquerade
You can unusually celebrate your birthday, setting up a masquerade. Invite friends, and let everyone make themselves an animal mask. It will be fun!
What will take:
cardboard plates
color cardboard and paper
scissors rubberbish
Sequence of work:
Coloring a plate in a blue color.

Cut the ears and also paint them.

Prepare from colored paper parts for a bunny.
Cut the holes for the eyes and cover the items, as shown in the picture.


Paper beads
What girl does not like decorations? Let's try to make beads from old magazines. You will get bright that you can wear with your favorite dress or give mom.
Sequence of work:
Cut out the log cabinet: strips of approximately 1 cm wide and elongated triangles.

Move the blank on the needles - it will be paper beads. Good short tip.

Make so many beads to have enough to decorate. Take a needle with a thread and carefully nasady all beads on a thread.

This is so easy to make unusual: original multicolored beads, bright bracelets. You can even give them to someone: what girl will give up such beauty?!
Paper crafts for children: jewelry for princesses
All girls dream of becoming real princesses. And what princess is without a crown? Let's make it from an ordinary cardboard roll.
What will take:
cardboard paint tubes
colored paper
scissors rubberbish
Sequence of work:
Cut from Rulon Corn. You can make a few pieces.

Coloring the workpiece in different colors.

Decorating the crowns. To do this, you can use beads, ribbons and a cord.
Make holes on the sides and grinding a gum so that the crown can be worn.

You can make the decoration for a real princess from a regular hoop: with the help of colored paper, turn it into a beautiful diadem.
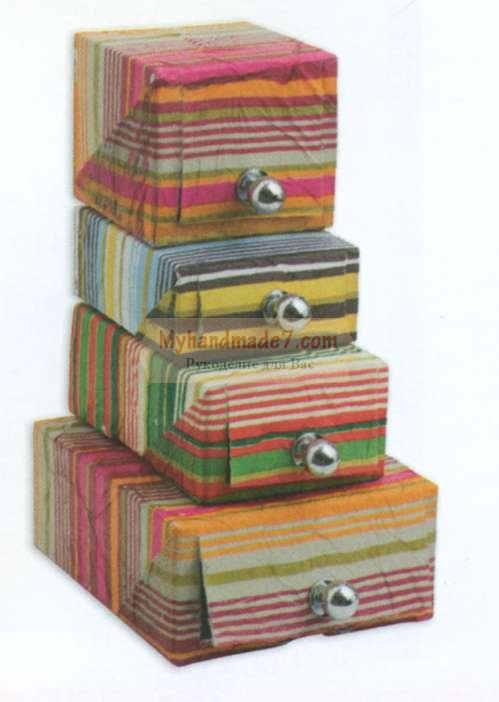
Paper crafts for children: toy locker
Probably, like all children, you have a lot. Sometimes they are so many that it becomes difficult to carefully fold. Let's make a beautiful locker for storing small toys.
What will take:
boxes of different sizes
gouache white
napkins with drawing
stationery knife
tassel knob
Sequence of work:
Flood the box with white so that the drawings and text on them do not shine.

Plug box from all sides with a napkin. To do this, put it on the box, pressing along the edges, and with the help of the tassels, the thick layer of glue is applied to above so that it sticks.

Cut the doors with a stationery knife - here you will need an adult help. Welts superclosure of the handles and scrupping them the boxes among themselves to get a locker.
Everything! Our chest ready. Now we can fold your toys. Here mom will be happy when he sees what your order is!
Creative box
Do you like to draw? Or maybe you like cut something or cray? It's great! Let's make a creative bag-box where everything you need to be folded for creativity.
What will take:
shoe box
wrapping
colored paper
glue lace
Sequence of work:
Crightened the box and cover from all sides. If it is hard for you, ask someone from adults about it.

Make the workpiece inside the box. At the bottom of the sheet folded in half of colored paper make an incision to the middle, as shown in the photo. Two the same billets in length as the width of the box will supervise from above to the middle.

Insert the workpiece into each other and place the box - it will be the branches of our bag.
Make holes on the sides of the box: they must be located at such a level so that the box can be closed with a lid. Make the handle of the same length from the cord so that the box is convenient to take in hand.

Handmade photo albums
Where did you go to rest for the last time? Maybe it was a trip with parents on the sea or vacation in the village of grandmother? Surely you have memorable photos. Let's make a photo album for them in the form of a suitcase.
What will take:
colored paper І and cardboard
piecol scissors cord
Sequence of work:
For the cover of the photo album, take a sheet of color cardboard and lay in half.

For pages, take the sheets of double-sided paper of different colors and also lay in half.

Now combine the cover and pages: for this, there are all together and hole punch holes. Tie the sheets with rope or cord.

Cut out the details for a suitcase from color cardboard and cover them to the photo album.


Paper crafts for children: Funny bookmarks
What is your favorite book? Or maybe there are several of them? It's great that you love to read. Let's make an interesting bookmark for the book.
What will take:
colored paper
Sequence of work:
History using a ruler on a sheet of colored paper three squares, as shown in the photo. Triangles that are painted, you will not be needed.

Cut out the workpiece.

And it is shown in the photo: first hitting the inner corner, then on top of it different. Spool them between them. Cut out the details from colored paper.

Great happened, right? Now it can be easily found in the book place where you finished reading. You can also make a bookmark and in the form of another animal, for example, a dinosaur with sharp teeth.

Cardboard bag
Do you know how from a regular box you can make a bright bag? Very simple! Let's dream and make such a handbag that can be taken with you to the street in sunny weather.
What will take:
dry breakfast box
colored paper
scissors glue
Sequence of work:
Pick up a gouache box.

Cut out the bag with handles. Here you may need an adult help.

Cut out of colored paper striped and circle - it will be a flower heart. The strip of laying the harmonic and spool ends. To keep the flower, take it on a small square. Top cover the heart.
For butterflies, cut out blanks of 1 colored paper. So that the figure turned out to be volumetric, you need to make 5-6 identical details. Skill them between them in the middle. Box all details to the box.

Crafts do it yourself from paper: stand for a pen
Want to make a gift to a friend, but do not know what to choose? Do not worry, I have an idea! Make an original stand for office supplies from an ordinary cardboard box. Such a gift will definitely like your buddy!
What will take:
boxes
equal width
white and colored paper, cardboard
glue Scotch
Sequence of work:
Make out of the boxes of the ship: cut the lid and cut them in height. The nose of the vessel and pipe do from the cardboard.

Okley every detail of colored paper from the inside and outside.

Cut and glue the windows, a lifebuoy, steering wheel, anchor.

Split boxes between themselves and the bonds of them on the base carved along the contour.

Applique with puzzles
Do you have unnecessary puzzles in which you have lost a lot of detail? I have an idea how you can apply them. Let's make a surprisingly colorful applique with autumn leaves.
What will take:
unnecessary puzzles strong paper
paint glue
Sequence of work:
Coloring puzzles in the colors of bright autumn leaves: yellow, orange, red.

From a strong paper cut the rectangle of brown color - it will be a tree trunk - and make her green grass.

Cover brown blank in the form of a trunk: For this, somewhere you need to squeeze the paper, but to straighten up somewhere.
Make from the cooked pieces of a puzzle of a tree crown. Also glue several layers of grass to get volumetric.


Paper crafts for children: Volume Picture
Want to make a volumetric applique? This is quite easy! You will have a real picture, which will be able to give a grandmother's grandmother.
What will take:
box from candy
corrugated cardboard
double tape glue
Sequence of work:
Cut from corrugated cardboard the necessary parts for the picture.

Shooting on the bottom of the box the first layer of the application is, that will be in the background.
Other details are touched on top.

What's the beautiful! It turned out a real volumetric picture. In this way, you can make a city where cottages and high-rise buildings are standing, or underwater world with seashells, algae and fish.

Budget in postcard
Want to give mom unusual flowers? Let's make a postcard-bouquet of colored paper. Believe me, she will like it.
What will take:
double-sided colored paper
scissors ribbon
Sequence of work:
Draw on a sheet of colored paper the workpiece, as shown in the figure.

Cut out the workpiece and separate triangle.
The glue is a small triangle from below, and a large part of the folds as shown in the figure.

Draw, and then cut out flowers of different sizes and color. Make leaves for a bouquet.

Guns inside our postcard Flowers in the form of a bouquet, pressing from bottom to the ribbon.


3D postcard
Surely you watched the cartoon in 3D and noticed how the characters come to life during the volume image. It turns out that it is simple to make objects three-dimensional. Let's try to make a postcard with a 3D effect.
What will take:
color cardboard, double-sided colored paper
scissors ribbon
Sequence of work:
Take two folded sheets folded: one - cardboard, the other - colored paper.
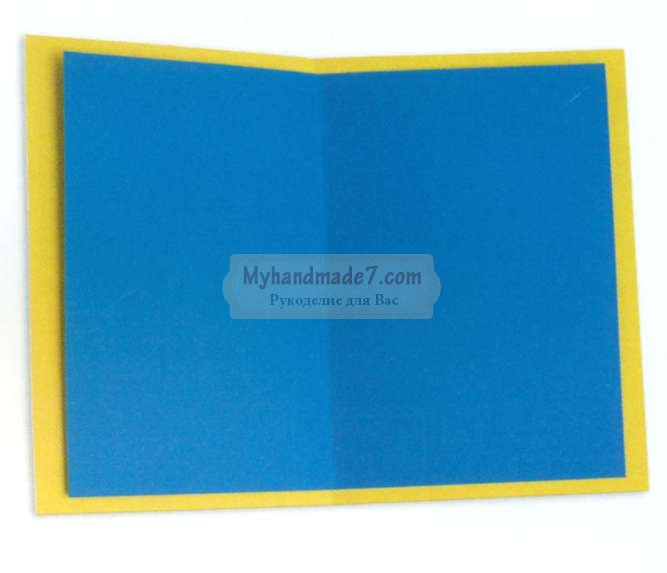
On a sheet of colored paper from the bend side, take suns, as shown in the photo. There should be 3 smooth squares of different sizes.

Now what you cut, put forward and inward. You must have a ladder, as if out of the boxes.
Shoot the workpiece on a sheet of color cardboard. Decorating the boxes: covered colored paper and ribbons.

By this principle you can make a postcard with balls

Postcard with palms
Want to make another unusual postcard? For this you do not need anything special: just on the sheet of colored paper and cardboard, scissors, glue and your wonderful handles.
What will take:
colored cardboard and paper
Sequence of work:
Watch your palm on a cardboard sheet.

Cut out the blanks. You will need two such details.
Cut out of colored paper striped and put it by the harmonica.

There is one edge of the harmonica to one "hand", and the second to another. Cut out colored paper or write congratulations markers.

Converter
Do you know how to decorate a small present? For this, it is not necessary to be adults and do not need any special devices. Repeat after me, and you will definitely work out!
What will take:
colored paper glue
ribbon
Sequence of work:
Draw on a sheet of colored paper 4 identical circles. It is easy to do if you take a mug, put it upside down and circle.

Cut the circles and put them in half.

Split circles with each other, as shown in the picture.

Begins free halves of circles so that one turned out on top of another. Then the bottom from one side will get up.

Sweet gift
Have you ever seen a gift decorated in the form of candy? Maybe they gave you something similar? Let's make such a surprise, and you will be able to "treat" anyone.
What will take:
cardboard tube
clay paper glue
scissors ribbon
Sequence of work:
Cut from wrapper paper square. In size, it should be more cardboard tube.

Omes tube paper. Tie a ribbon one end of candy.

Some in the gift candy and start the other end.
3D-Figures
Have you ever wanted to unusually decorate your room? Let's make volumetric figures-decorations made of colored paper. They can be put on the bedside table or hang on a thread to the chandelier.
What will take:
colored paper glue
scissors ribbon
Sequence of work:
Draw on a folded double sheet of colored paper. Half of apple, as shown in the photo.

Cut out the workpiece and, using it as a template, take 5 such copies. Additionally cut out the details for the apple.

Screws blanks between themselves, as shown in the photo.

Wasted the rest of the details.

Fruits and vegetables can be anyhow!
Cardboard and Paper Crafts: Bright Flowers
Do you want to grow bright flowers on your window? Let's make them out of the cardboard tubes, but so that no one can guess which material they are.
What will take:
cardboard paint tubes
colored paper glue
scissors spanks
Sequence of work:
Make cuts from two sides of the tube so that they do not reach the middle.

Coloring the tube in different colors.

When the workpieces are dried, repeated petals, as shown in the photo.
Window middle cut from colored paper.

Skamp of bluing colored paper, cutting leaves.
Connect all the details. Skeleton Make a hole in a flower heart.
Such a flower can be put in a vase and give someone.

Frame from unusual flowers
Do you have a boring one-color frame? Let's make a real masterpiece!
What will take:
cardboard box from under eggs
scissors glue
Sequence of work:
Cut from cells of the cardboard box blanks of petals, as in the picture.

Color them into one color. You should have 15-18 such sets of different colors (depending on the size of the frame).

Split petals among themselves in the middle, carefully a priest and give them to dry.
Cover flowers on the frame. It will not be possible to attach everything to immediately, so do it statenly and wait until everything is dry.

Frame is ready. Now you can insert your favorite photo.
Cute cactus
How do you like a pretty cactus? It is completely safe for children, because the spines are drawn on it. Let's make such a cactus and put it on the windowsill.
What will take:
feltolsters
Sequence of work:
Draw on cardboard cactus in a pot.

Color the picture on both sides and make another exactly the same.

Do not cut: on one cactus from below to the middle, and on the second - on top to the middle.

Insert the workpiece in each other. Cactus ready.
In the same way, you can make a rocket or a bear.
Colored lanterns
You have a birthday soon, and you want to decorate the room to be festive and beautiful? Then let's make unusual colored lanterns.
What will take:
toilet paper tubes
square paper
ribbons
scissors glue
Sequence of work:
Cut out the square of the strong paper and placled one side of the tube.

Make a billet from a strong paper: cutting strips and finish cuts on one side along the entire length.

Start shook the tube from below. You have to get a skirt, as in the photo.
Thus, the whole flashlight attractions. From above on the sides, make holes and extending through them a ribbon so that the craft can be hung.

Such lanterns can be not just an ornament, but also a useful thing. For example, on the holiday you can arrange a game with prizes: hang lanterns on the rope and put something valuable in them by gluing the bottom. Each guest with tied eyes must cut off a gift with scissors.

Room decoration
Do you dream to start a bird? Of course, nothing will be compared with this, but still an extraordinary and beautiful bird can be made from ordinary colored paper. See how this is done.
What will take:
double-sided colored paper
ski paper scissors
ribbons
wire
Sequence of work:
Draw on a sheet of paper silhouettes of birds.

Cut them. Do some such billets. They must be different colors.

Make the wings from the strong paper: for this, cut off the rectangles of different colors and thereof the harmonica.
In the billets of birds, make cuts and insert the wings there. Tie the ribbons to the figures and them on the circle cooked from the wire.
Creative people sometimes do not find the ideas of what can be made of paper. Each thing is an amazing and attractive object for Furnishing. Creations become decorations of the residential room. As a rule, these are diverse compositions and figurines.
Basic material for them - paper. Unfortunately, according to the experience of many, the arrows are exhausted. We offer some of them. They are multifunctional, designed for both professionals and beginners.

Previously, we clarify that work with your own hands is good not only by the fact that it takes free time, but also develops a shallow motorcy. It also contributes to improved memory and creativity.

Simply put, creativity develops the right hemisphere of the brain. Moreover, both the overall health of health improves: the pains are reduced: noving or migraine, moral stress and fatigue diffuse. This is a good rest that enhancing self-esteem and mood. We propose to start a business!


Materials
- Colored, white, corrugated paper. Purchase A4 format;
- Multicolored cardboard;
- Scissors;
- Adhesive pencil and PVA;
- Line (10-30 cm);
- If necessary, markers or pencils;
- If possible, pick up mini-staplers to give the originality.

In the shops of the office purchase the necessary arsenal. Usually, experienced creators are almost all things in the workshop.

Manufacturing bookmarks
Bookmarks are used to quickly read or explore anything. Of course, it is extremely nice to look at the attribute in the book, which with love is made by the reader. Consider several ideas.

Heart-shaped
- Use the basis carved from the tight material square.
- Billet Bend from each of its faces to get a triangle.
- Begotes each side upstairs.
- About 1 cm. Bear to the formation of lateral triangles.

Corner bookmark
- Fold in half the vertical square of the paper.
- Side corners of the triangle bend upstairs, return to the opposite position.
- Check the upper angle.
- Repeat manipulation with side. Place them into a fold.

Accessory is good for those who constantly lose everything. The bookmark does not fall, it is clearly fixed on the edge of the page.

Worm
- Print the template in the form of a worm or snake.
- Put it with strips of excellent texture and shade.
- Make eyes or draw them.
- Through the hole punch punch holes.
- Thread tape. Attach it to the cover of the book.

So, you got acquainted with the methods of design of bookcases. Agree, they are much moresed in comparison with a sheet pulled from notepad.

Volumetric scenery
A 3D method allows you to make products that will certainly attract enthusiastic views of the guests.

So you can adapt to the premises:
- Garland;
- Wall panel;
- Suspended decorations.

The period of making crafts, in contrast to monotonous and fairly boring, will take longer: both a few hours and 2-3 days.

However, capacious multifaceted things look much more interesting, they are noticeable and attract attention. They are sufficiently easy for manufacture.

Paper garlands
There will be two layers of blanks. They can be of various shapes: circles, asterisks. The main thing is to comply with their symmetry in a vertical section.

Similar figures cut out of cardboard that distinguishes density. Those that will be top to decorate better or make from decorative paper.


The entire manufacturing process is concluded in compound 2 layers between each other. Suspend the resulting figures on the ribbon. For convenience of attachment, apply hole punch.


Paper panel
The technique of execution panel is not very complicated. It is suitable even for beginners.
- Decide with the form of details: butterflies, hearts. Choose symmetrical.
- Cut blanks from decorated cardboard.
- Bend the parts twice vertically. Thoroughly fold the fold, this is a place for future fastening.
- With the help of glue, fasten the elements along the bend line.

Consider the fact that, glue anything on the wall by means of adhesive fluid, you spoil the wallpaper forever. In case you are not ready for this responsible step, place parts on the paper sheet of any convenient format (choose A4 or A3). Decorate the product with a beautiful frame or baguette. In this way you can save the wallpaper.

Hanging decorations. Method of manufacture
Socket - a worthy example of such a decoration. Often we can meet her as a Christmas tree toys for the new year.


Execution technique - origami:
- Divide the square on 2 equal rectangles. One of them - again into two parts.
- Make a fold line from each side of the shape.
- As a result, the harmonica should be turned out. If not happened, finish work.
- Fold the workpiece in half to get like a semblance of a fan.
- Squares also turn into a harmonic.
- Connect all the details on their faces with a glue gun.

The decoration can be suspended above the desktop, or apply it as a toy over the baby cot. Follow the analogy.

Take the basis of 25x25, 15x15, 20x20 cm. Select the length, based on the dimensional dimensions. Remember that we need to think about every step. Invalid action contributes to reworking all the work.

Luminous garland can also be made independently. To do this, do in the center of the hole, insert bulbs in them.

Suspend garlands on tree branches. Will look unusual and original.


In case of difficulty, contact the Internet, where step-by-step schemes and master classes are given.


The choice for presented by many interesting ideas for self-made crafts. Each of them can be given individuality.

A needlework from paper will be useful both adults and children. After some time, the work will be given very easily. The process will bring joy and pleasure.

We recommend to teach children to creative work from the earliest childhood. It is at such a stage of development that you can develop attentiveness at your baby and hardworking. Do not forget to help him. Thus, you will get combining pleasant and useful.


Impact crafts from paper with their own hands, we learn to do in childhood. Ship, airplane, New Year's snowflake, Mom's postcard for March 8 - which of us has ever done them. Affordable and malleable material has become the basis for the amazing art of origami invented by the Japanese. About how to make under the tree From paper for home decoration, we will tell you.


Putpier-Masha

Paper carousel

Cute dandelions of paper
For crafts, you can use any paper. Colored sets for children's classes, corrugated sheets, paper napkins, cardboard - from all these varieties, entertaining, useful and beautiful things for home are obtained.
In the crafts from corrugated paper with their own hands, flowers look very beautiful and realistically look. Rose petals from such paper are obtained as real. The same rose can be made in another way, cutting out a spiral from thick paper, and bent it out.
All sorts of boxes, caskets, cardboard stands will always be used in the household. Favorite turntables perfectly fit into the situation of the country area. Toys on the New Year tree from cardboard can be made by the whole family, giving them the most original images.

The turntables for children
The traditional paper fan can become a wing and tail for the paradise bird, and the cardboard cylinder from the toilet paper will successfully serve as a base for the cockpit or dog body.
Crafts from paper "Flowers of Daisy" will beamiously, for the manufacture of which it will take quite a little time. The middle of the flower can be done by wrapped the rolled ball from the napkin with yellow paper. You need to get a paper chups. Then around it wrap a strip cut from corrugated paper several times and secure it with a thread. To give the flower of a realistic type, let off the edge of the paper by different color. Craftsmen who have long been working with paper, create amazing things. These are floral compositions, and figures of animals and birds, and picturesque panels.

Volumetery, imitating rose petals
Tip! For serious works, with many details, such as chic paper peacocks and parrots, it is worth starting, having a solid work experience with paper.

Decorative fan.

House for tea bags

Elegant envelope for the holiday
Festive decorations
An openwork snowfish on the window will not surprise anyone, but if you want to stand out and deliver the pleasant guests, while spending a minimum of funds, it is worth mastering more complex designs.
Paper garland - This is a universal decoration and to the new year, and to the birthday. It can also become a permanent decorative element for a nursery or bedroom. Since our task is to teach you how to make a paper craft with your own hands, we will not only tell me, but we will show you the whole process of manufacture.

Garland links
Let's start with the preparation of tools and materials. We will need:
Colored paper
Our goal is flat garland chain. What should I need to build a chain? Of course, links. We will cut them out of colored paper.

Three-dimensional garland chain

Multilayer garland of colored paper
Important! Decide in advance which size of the links and the length of the chain you need. Based on this and produce the amount of colored paper.
Getting to work:
We fold a sheet of paper in half.
Draw on one side the shape of the link. It may be a circle, an elongated loop, a square or heart, as you like more.
The first link can be used as a template for subsequent details so as not to draw it every time.
Cut the link on the outlined lines.
Preparations of a sufficient number of links, start assembling the garland.
We glue both halves of the link.
Take it into it the following, still uncrowned link, and then glue it.
We continue to assemble the garlands to the length you need.
The whole family can take part in the workflow. Distribute duties, and it will go faster.

Gift Packaging Paper

Roses from the newspaper with the effect of ombre

Colored paper aerostats
Applique from paper Applicable for registration of greeting cards, and to create wall panels. And again we are waiting for crafts from colored paper with their own hands with step-by-step instructions.

Volumetric paper applique - Heart
The easiest way to cut out of colored paper flower, stick it onto a white sheet and the applique is ready. Even a child to complete such a picture, which is successful and engaged in labor lessons. For the work of an adult person, we offer bulk crafts from paper, including applications.
That panel should turn out from us.

Paper Paper with Terry Effect
For work, prepare:
Color paper (blue, yellow, green and brown).
Pencil.
A piece of cardboard for the base.
Since we have to create a craft from paper and cardboard with your own hands, we will make step-by-step instructions.
Rapid paper on squares with a side of 2 cm.
Cutting paper for squares.
Take one square, put a sharp end of a pencil in his center and fermenting paper around a pencil. (In order not to break the paper, fill the pencil, and spend the twisting canopy).
Pretending a sufficient number of details, proceed to the "writing" panel.
Discontinue the boundaries of colored fragments on cardboard.
We begin to fill them, sticking the cooked squares. For simplicity, we ride the square on the finger, we apply a drop of glue on its bottom and press to the cardboard.

New Year's postcard do it yourself

Thematic greeting card as a gift Needlewoman
In the same technique you can perform more complex pictures in the plot. You can give such a craft from paper for a birthday or use it as a decor for a cottage or children's room.
Very beautiful crafts from paper can be made, replacing smooth sheets on soft napkins. In order to lay out the panel, you will not need scissors and pencils, simply fruit multicolored napkins and make a drawing from shapeless rods.

Cake from cardboard with gifts for guests

Decor for the Day of St. Valentine

Elegant decorative shoes
Origami
If you want to decorate the house on paper figures, you should pay attention to the ancient Japanese art. Original paper crafts with their own origami hands require care and patience when assembling.
Bridal wedding bouquet
If you first decided to take the origami, it is better to start with simple designs. Here, for example, how the swan is going. In addition to the scheme, we have made a phased description for such a craft of paper.

Take a square sheet of paper convenient for you.
We fold the sheet in half diagonally.
Bending in both directions and return to its original position.
Bending the sides of the square, adjacent to one corner, to the central diagonal.
We make the wings of the swan, reducing the vertices of the resulting triangles at an angle.
I turn over the folded sheet down and fold up diagonally.
Measure on the base of the resulting triangle 1/3 of its length of its main side.
Now the left sharp angle should be turned inside out. Watch that its parties are formed with a right angle.
Bend the top of the resulting small triangle 1 time to get the neck of the swan.
Swan's tail we get, parallel to the running right triangle of our workpiece. We add them to the accordion and figure is ready.
Note that the first origami assembly experience may be impaired by execution. Do not worry, repeat the folding several times to fill the hand.
Funny crafts for summer with their hands from paper will help you decorate a summer gazebo or country house. And we offer you a practical video for creating a paper lamp:

Paper megapolis

Candlesticks from paper

Modular origami
Paper crafts - Video