A cage made of newspaper tubes: master class step by step - quickly and incredibly beautiful. Cage for photo shoots
Weaving from newspapers. Bird cage. Step-by-step master class.


Weaving from newspapers. Bird cage


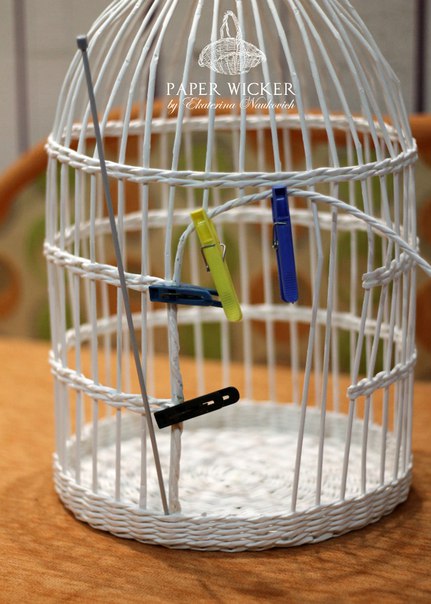
For a large cage, like this one (height 60 cm), I built up the racks after lifting them from the bottom - I cut the old ones, inserted the new ones next to them on the pva, and then closed the stumps with the next row. But usually I prefer to build up the racks on the bottom, so it's safer. 
Beginning to weave hanging rows

When weaving "hanging" rows, I glue the working tubes to the racks every 3-4 racks so that the rows stay at the same level and do not slide down.

I decide in advance how many racks will form the entrance to the cage, and I do not weave these racks, but turn around and weave in the opposite direction.


i cut and glue the tubes. When decorating the entrance, these places will be covered with a flagellum arch.

at this stage I increased the racks - the length of these was not enough for the formation of the dome. For large cages like this, I insert a wire inside the racks.

i form a dome and tie it with jute twine

i left 6 ends of the entire tail, cut off the rest and missed the pva abundantly

I divided 6 ends into 2 parts (3 on each side), and connected the bundles to each other in the form of a ring

Now I wrap the ring with tubes according to the principle of weaving a twisted handle. You can make it easier and just wrap the ring with one tube. It will look different.

i wrap the ends and twine with a tube, smearing with glue in some places.

i twist a flagellum from two tubes to decorate the entrance to the cage

I cut off the free racks at the bottom, make a hole in the weaving with a thick knitting needle, insert the beginning of the flagellum there and glue it along the rack

i form an arch from a flagellum, at the top marking the level at which I will cut off the free racks

i cut the racks, and stick the tips inside the flagellum and fix it with glue. After the glue dries, I do the same on the other side. If you just glue the flagellum on top of the racks, then the arch will bulge slightly forward.


When I started weaving, I didn't even know how much this type of creativity is in demand. Almost everything was planned for home, for gifts (again, for the home, but not for your own). And then I saw handbags, and then showcases, in which charming lashes flaunt.
Spring is coming, imagine several of these cells hanging on the tree where you are taking pictures - beauty!

A master class from a needlewoman from Minsk, whose work I am inspired by tracing her pages on Instagram and VKontakte.

“For a large cage like this one (height 60 cm), I built up the racks after lifting them from the bottom - I cut off the old ones, inserted the new ones next to them on the pva, and then covered the stumps with the next row. But usually I prefer to build up the racks on the bottom, so it's safer.
Beginning to weave hanging rows

When weaving "hanging" rows, I glue the working tubes to the racks every 3-4 racks so that the rows stay at the same level and do not slide down.

I decide in advance how many racks will form the entrance to the cage, and I do not weave these racks, but turn around and weave in the opposite direction.


i cut and glue the tubes. When decorating the entrance, these places will be covered with a flagellum arch.
at this stage I increased the racks - the length of these was not enough for the formation of the dome. For large cages like this, I insert a wire inside the racks.

i form a dome and tie it with jute twine

i left 6 ends of the entire tail, cut off the rest and missed the pva abundantly

I divided 6 ends into 2 parts (3 on each side), and connected the bundles to each other in the form of a ring

Now I wrap the ring with tubes according to the principle of weaving a twisted handle. You can make it easier and just wrap the ring with one tube. It will look different.

i wrap the ends and twine with a tube, smearing with glue in some places.

from two tubes I twist a flagellum to decorate the entrance to the cell

I cut off the free racks at the bottom, make a hole in the weaving with a thick knitting needle, insert the beginning of the flagellum there and glue it along the rack

i form an arch from a flagellum, at the top marking the level at which I will cut off the free racks
i cut the racks, and stick the tips inside the flagellum and fix it with glue. After the glue dries, I do the same on the other side. If you just glue the flagellum on top of the racks, then the arch will bulge slightly forward.

For a large cage, like this one (height 60 cm), I built up the racks after lifting them from the bottom - I cut off the old ones, inserted the new ones next to them on the pva, and then closed the stumps with the next row. But usually I prefer to build up the racks on the bottom, it's safer that way. "


Surely, many are delighted with the vintage style. There is an aura of mystery and superiority in him, and some feel a continuous connection with previous generations. And how many mysteries, metaphors and even mystical meanings are endowed with cells? Now, let's put it together? So also do it yourself, you get a magical combination! And it is our master class on creating a cage from the simplest newspaper tubes that will be inappropriate for you. And the photo will serve as an excellent visual example.
Here are some examples of how you can design a cage, but after all, human imagination has no boundaries, so you can play with styles, sizes and design as much as your heart desires. But, in order to start creating, you need to know what materials we need.
We make a cage from newspaper tubes: a master class with a description
We need:- PVA glue.
- Toothpick.
- Pin.
- Spoke.
- Cash register tape.
- Scissors.
- Three-liter jar.
- Acrylic lacquer.
- Varnish brush.
- Decor (beads, ribbons, flowers).
- Newspaper.
It is easy to see that the materials are widespread and if they are not at hand, then buying will not be a problem. So besides the fact that the cage will be beautiful, it is also budgetary, which is doubly more pleasant.
We make the cage step by step:It is not so difficult, especially when there is a photo and video instruction. The main thing is to adhere to all the nuances and then everything will work out.
- First you need to prepare the tubes. We take a knitting needle about 2 mm and a newspaper tape 50 cm long and 10 cm wide.Further we take a knitting needle and begin to wind the tape obliquely, do it carefully and evenly, so that the resulting, so-called tube, is without gaps and the sheets fit snugly against each other. friend. After that, take out the knitting needle and grease one corner with Pva glue. We need 50 such tubes.
- We take ready-made tubes and insert them into each other, thus, lengthening them, you can continue indefinitely, it all depends on what size the cell you want. In today's master class, we need 10 pieces.
- Before you start weaving the cage, you need to make the base. For this, five tubes are placed vertically and five horizontally on top of them. Having bent the horizontal tube in half, we need to bring it under the vertical. Now, according to the chess principle, we start the front part of the working beam, behind the second rack, and bring the rear part in front of the second rack.
Then, on the contrary, we translate the end of the working tube, which is behind the second post, forward of the next 3rd post, and take the front end behind the post. We need a diameter of 20 cm.
- After the row is over, tuck the ends into the braid. Take a ruler and mark the optimum height for you. And in the same pattern as indicated above, weave 2 more rows along the marks.
- After 10 centimeters, weave 4 more rows. Take an unused tube and make a circle of 6 centimeters. Take it and stick in all the stitches, bend them and glue them. Make a loop from the tubing and attach inside the top corner.
- Take a jar and twist the tubular cone around it. Secure the cone at the top.
- To make a cage door, cut a few posts in the bottom row and attach the door with wire eyelets.

For this you need to take such decorative gizmos that have sunk into your soul. It can be all kinds of bows, flowers, beads, paint, old notes. Of course, you can paint the cage yourself like this, but, alas, not everyone has an artistic talent.
Option one, which you can use to decorate the cage:
- Napkins.
- Glue.
- A fake bird.
- Paint.
- Paint the cage white and let dry.
- Take napkins pink and white, make roses out of them. You can choose the rose technique yourself. You will need to cover the bottom of the cage with them.
- Place a newspaper tube horizontally inside the cage, making it like a perch, and place a bird on it.

Option two:
- Artificial flowers.
- Paint.
- Paint the cage whatever color you want.
- Attach flowers at the top.

In fact, there are a lot of options, it all depends on your imagination, capabilities and time at your disposal. It can be from a large-scale and complex design to the simplest. If you like it, then it can even be a good option for additional income. Such a cell will always delight you, even on the gloomiest day, because everything done with your own hands is valued much higher than factory made.

Related videos
Visual information is better remembered and perceived, so here are some video links that will be useful for making a cage from the simplest newspaper tubes:
Good evening, my guests, dear craftsmen and needlewomen) I appeal not only to girls, but also to boys, because I know that many of the men who are my readers are fond of weaving from newspapers. Some of you have been weaving for a long time, while others are just looking at this kind of needlework technique, waiting for that very pendel that will make you start weaving))) So: today's idea is very suitable for beginners in weaving. I would like to propose you to weave an Easter cage for a bird for the upcoming holiday of light Easter, to create decorative compositions and decorate a festive interior. Watch the master class that will help you cope with this work, it is very simple and easy.
According to the master class below, you can weave a cage or a decorative basket with a top, the one on the right in the photo below. If you still do not know how to twist pipes, check out the master class from the previous publication.


Easter cage made of newspaper tubes
For work we need:
- tubes from newspapers or magazine pages,
- cardboard,
- paper glue,
- scissors,
- a form for braiding - a plastic cup or any other dish,
- clothespins,
- paint or stain
- wood varnish,
- chickens and Easter eggs - optional,
- ribbons, artificial grass, moss, sisal, flowers, etc. - for cage decoration.
Let's get to work. In this variant of weaving, we do not have to weave the bottom, which will greatly facilitate the work. We will have a cardboard bottom - we cut out two circles from cardboard. The diameter of the cardboard circles should match your braiding shape. We glue newspaper tubes between the cartons - 7 tubes plus one additional tube for weaving.

After the glue has dried, we put a form for braiding on the cardboard bottom - a plastic cup (vase, bottle, cup, etc.) and bend up the tubes, all 7 pieces, fixing them with clothespins.

We begin to weave the cage, we braid the tubes. We weave 4 - 5 rows, build up the tubes in the process of weaving, then cut the newspaper vine and glue it on the inside of the cell. We continue weaving from the middle of our glass, glue the tube and weave several rows up.


We finished weaving, go to the top of the cage, for which the tubes need to be collected in a bundle. If the vertical tubes are short, extend them with additional ones. Our cage is ready, you can paint and varnish it.


We put sisal, artificial moss or grass in a decorative cage, plant chickens, lay Easter eggs. Or you can just put a bird in a cage - an artificial goldfinch, a canary or an owl (look), if Easter is already over.
That's all handmade for Easter) I said that the master class is very simple and easy, just for beginners in weaving.


And now I propose to look through the ideas of Easter decor from newspaper tubes. Most of of these works are woven using spiral weaving, see spiral weaving master class
Real craftsmen are good because they can make a real masterpiece out of any unnecessary thing. Crafts from newspaper tubes confirm this. After all, it is very difficult to make a beautiful thing out of simple newsprint. But it turns out that different useful things are obtained from this simple material. And the secret is that needlework masters have learned to twist tubes from old newspapers, paint them in the desired color and weave various beautiful crafts and decorative objects from them.
How to decorate the interior with newspaper tubes
Quite often, products from newspaper tubes are used as a beautiful decor in the interior. As an example, you can make a decorative cage with your own hands from newspaper tubes. It is so easy to perform that it is suitable even for beginner craftsmen.
For work you will need:
- Newspapers;
- Stationery knife;
- Spoke;
- PVA glue.

Manufacturing process
- A sheet of newspaper is divided into 3 parts lengthwise and cut into strips using a clerical knife.
- Coat a thin strip with glue along the long side. Roll the paper tightly around the needle from the corner. Press the end well so that the tube does not unfold. Take out the spoke. The following tubes are done in the same way. To work, you need a couple of dozen parts.
- The finished tubes are painted in the desired color and laid out on a sheet of paper until completely dry.
- After drying, take four pairs of tubes and lay them in a square with a side of 2.5 cm so that each pair crosses one from above and the other from below. The intersection should form in the middle of the tubes.
- Extend the tube by inserting one glued end into the other, slightly scrolling.
- Bend the long tube in half and circle the far pair of the square. They cross, change the upper and lower tubes in places and start them behind the next pair of racks. Cross the tubes again, wrap and circle the next pair of racks. Lay the row as close to the sides of the square as possible. Weave in the same way in a circle to the end of the row. Make sure that the square does not lose its correct shape.
- The second row is woven in the same way. Build up the tubes as needed.
- When the two rows have already been braided, begin braiding each strut of the pair separately.
- Next, 12 rows are woven without changes.
- The tubes are fixed near the last rack of the 12th row, fixing with glue, and the excess tails are cut off.
- Build up all 16 racks.

- After that, they bring the last stand of the 12th row under the next one on the left and bring it up. Continue in the same way until the end of the row.
- With an elongated tube folded in half, they grab any rack and weave the walls, crossing the tubes, as when weaving the bottom. Make 4 rows.
- They hide the tubes near the last rack, cut off the excess ones.
- They retreat 7 cm and continue weaving. It is necessary to ensure that the distance between the posts above and below remains the same. At the end of the row, the ends are fixed and the excess is cut off.
- Bend the racks towards the center to make the cage dome. Take 2 adjacent tubes and, stepping back 4 cm from the last row, braid them together. This is done until the end of the row. Try to keep the dome tapering evenly.
- To prevent the weaving from unraveling, fix the row with a clothespin while the tubes are growing.
- At the end of the second row, glue the tube around the rack. An internal one is cut from each pair of racks.
- Bend the remaining racks in a semicircle, glue the end of one into the base of the other opposite. You should get a vault. If there is not enough length, the rack is extended.
- To make a handle for a cage, take a tube and bend it with a ring. Make 2 turns between the posts of the arch and connect it.
A basket of newspaper tubes is woven according to the same principle. Such weaving is especially important for Easter. The base of the basket is woven in the same way as the cage. But to simplify the work and in order to get a beautiful and even shape, they use some kind of container. The depth and shape of the basket itself depends on the volume and depth of the container, which will be braided with newspaper tubes. To simplify the task, you can use diagrams. They clearly show the step-by-step sequence of work.
How to paint newspaper tubes
To give the product the desired color, the tubes are painted before weaving. To paint colored tubes, use a primer, it can be absolutely any. Also use a brush and a glass, where the paint is stirred. Dyes are used along with the primer to give the straws any color or shade.

To stain the tubes in woody shades, use a stain. If the stains are not water-based, dilute them with solvent. You can also paint finished products. A finished basket of newspaper tubes can be painted with a mixture of water, PVA glue and white acrylic paint.
Using various photos and videos, you can create unusual options for products from newspaper tubes for every taste.
Related videos