Where to make sockets in the apartment. Wiring in a private house Step-by-step scheme
The location of the power points, the height of the installation of sockets and switches is a serious question that requires planning, drawing up schemes, calculations of their number for each room.
If you have to carry out the preliminary planning to carry out the installation, you will not have to unwind the extension cable, stumble on carrying and connect everything in a row, thereby overloading the outlet or even the network.
Our material will help you determine the optimal amount of electrical fittings and the rules for its location. We also tell me about all the intricacies of accommodation and installation of electric fits in an apartment or house.
According to estimates, each person uses about six different electrical appliances per day. And the number is constantly growing. New devices and gadgets appear, without which life can be imagined.
The devices fill our homes, and the number of sockets remains unchanged. Cases when a man in a panic runs around the house or office, in finding a free connector for charging a smartphone, more and more often occur. And what in the end? You have to turn off the printer or anything else.
It is easy to avoid such situations, you only need to know how to position the connectors correctly. Then to use them will be the most comfortable as possible.
Gallery of images
We must not forget that products can be susceptible to even greater danger. Since the bathroom is at risk of flooding, attaching products below 150 mm from the floor is completely unsafe. If water falls into the outlet, the threat to life is just colossal.
The reasons for this can be various situations, from the leakage of the crane or pipe, to the breakdown of household appliances or the forgetfulness of the owners.
# 3. Specificity installation in the living room
Home cinema or simple, and better than two. The first for the TV receiver itself, and the second for the satellite receiver. The height level should be determined based on the location of the TV itself. It can stand on the end, to be mounted in the wall or fit into a special cell of the furniture wall.
The power cable cannot hang or be under tension. It must completely hide behind the screen.
#four. Location rules in the kitchen
Each year is developing more and more smart techniques to ensure the comfort and temporary costs of a person. Naturally, the amount of technology, which means there are simply offslee. In mandatory, it is necessary to provide an exhaust connection, possibly washing and dishwasher, electric stoves.
But the main thing is a refrigerator, a microwave or a multicooker, sometimes both. Mixer, juicer, combine, toaster, blender, coffee maker and TV - this list, probably endless.
The installation height determines the comfortable conditions for living in the house, its safety, improvement and beauty.
Conclusions and useful video on the topic
Sounds of mounting sockets and switches in the kitchen are shown in the video:
Where harmoniously position the switches and sockets:
Suitable height for mounting sockets and switches:
Before you begin to work, remember that electricity is not toys. It requires an ideal approach to business. Installation of sockets and equipment in the kitchen, in the bathroom and the corridor it is desirable to charge a professional electrician who owns specialized tolerances to perform electrical work.
A question appeared on the topic of the article or do you have recommendations for calculating and installing electrically in the room? Please leave your suggestions in the comments under the article.
Every person building new house Or making overhaul, the reconstruction of the old house wishes to fulfill all work in a short time, qualitatively and with minimal financial costs. To do this, we need to think about and make a draft of all future communications, taking into account the sequence of installation work. Therefore, you should correctly appreciate the possibilities: what can be done with your own hands, and where to trust specialists.
Montage sequence
For new buildings, first of all, it is necessary to consider from which source electricity will come to the house. This may be the nearest LPP or substation. At the construction stage it is worth agreed by this issue with energy and make temporary installation of the distribution shield. It is worth choosing a place and install a ground loop for the future at home. The introductory cable can be routed by an air or underground line depending on local conditions.
All these details are consistent at the initial stage of construction work. Locking the cable, you need to immediately take into account its parameters:
- terms of placement: air line or underground;
- length;
- cable brand, insulation type: rubber or PVC;
- the amount and cross section lived.

Laying cable in a private house
The wires must be copper, they are more durable, since it is withstanding a large current load, comply with the requirements of PUE guidance documents (rules for installing and operating electrical installations). It is very important to draw attention to the fact that the entire internal wiring of private residential buildings is made copper wires.
The cable wire section is calculated taking into account the magnitude of the load, which is planned to be used. All this data are displayed in the installation of wiring; A floor scheme is drawn up, in which all elements and locations of their location are designated:
- an introductory shield with the number of protection machines, their brand;
- wiring routes indicating the length and labeling of the cable;
- junction boxes;
- switches and sockets;
- elements of the lighting system;
- separately indicate the location of the sockets for the wiring of powerful heating devices.
Based on the data of this posting scheme, it is possible to calculate the main elements of electrical wiring and consumables:
- protection machines;
- switches;
- junction boxes;
- outcome;
- wires of various sections, sockets for lighting and common tract;
- dowels, self-tapping screws for fastening the distribution shield, clips fixing the wire.

After the above events, it is possible to start the electrical wiring in the house, after installing the grounding circuit. A place for the grounding circuit is selected not far from the permanent input switchboard.
Installation of this design is simple, everything can be done with your own hands if you wish. Many specialized stores sell ready-made sets for grounding private houses with detailed instructions, on which it is easy to collect and install it with your own hands.
Connection scheme
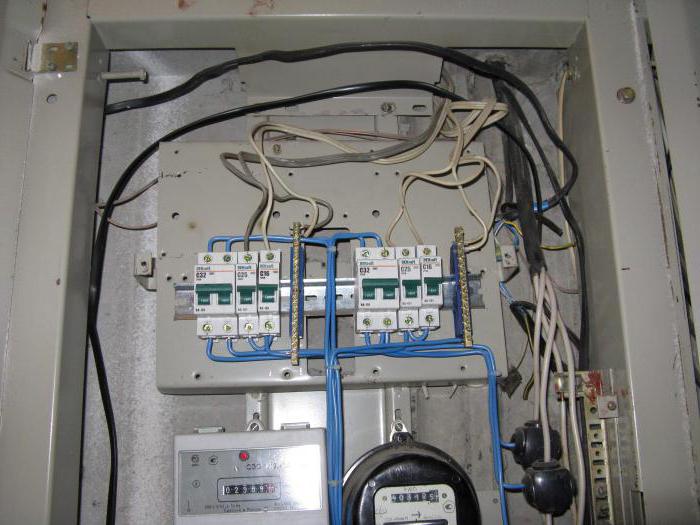
The installation of electrical wiring is carried out according to the project plan and the installation scheme of the introductory distribution shield. The main components of the elements of the wiring:
- introductory automatic protection;
- electricity consumption accounting node;
- protection machines for individual groups.
In a private house, we usually share electrical wiring on 3-4 groups: lighting, sockets, utility outdoor, garages, sheds and separate wiring group - for powerful heating appliances.

Installation of wiring in the house
Cable selection
For wiring, PUNP cables are used in dual PVC insulation on a separate wire and a common shell.
VG 3x2.5 - these numbers indicate that in the cable there are three copper wires with a cross section of 2.5 kV / mm. Such wires are used for wiring of socket groups. For lighting, a cable with 1,5 kV / mm wires is used. Between the distribution boxes, the wires with a cross section of 4 kV / mm are usually paved.
For individual groups of electric heating devices: furnaces, boilers, washing machines put a wire of at least 6 mm / sq.
The cable in four wires from the camshaft is laid directly to the instrument on the electric furnace, a boiler, a split system or a washing machine. These cables are desirable to lay without junction boxes, to each element in the introductory shield to put a separate automatic protection for the calculation of its maximum current load.
In the lighting circuit between the camshafts, a cable with 2.5 kV / mm wires can be laid. If we are talking about modern electrical appliances, chandeliers and other lighting structures, then we usually use wiring with 4 wires that are grounded. On sockets, also a contact of the grounding wire is also provided, it requires PUE.

Example of a distribution box circuit
In the socket group, a cable in four wires with a cross-section of 4 kV / mm are paved in the socket group between the distribution boxes. From the box to the socket, you can launch a cable with a cross section of 2.5 kV / mm wires, it withstands load currents up to 30A from devices that consume power up to 6 kW. This is quite enough for long-term operation of irons, vacuum cleaners, phenomena and even household heating calorifications with a capacity of 700 W to 1.5 kW.
Electricity divorce
Installation of wires on the walls, fastening of the peales and junction boxes can be made with their own hands. The most difficult and responsible business is the correct placement of the wiring, connecting contacts in the junction boxes and collecting the scheme. Subsequently, it is quite difficult to correct errors when connected in junction boxes. If you don't do it with your own hands, you should invite to help a specialist.
Wiring inside the house may be several types:
- in cable channels.
Open wiring is used very rare in wooden houses on special insulators, in modern conditions To do this, use plastic cable channels. In them, the wiring is reliably protected from mechanical damage, They do not burn, easily attached to a wooden surface.

Installation of open wiring in the house
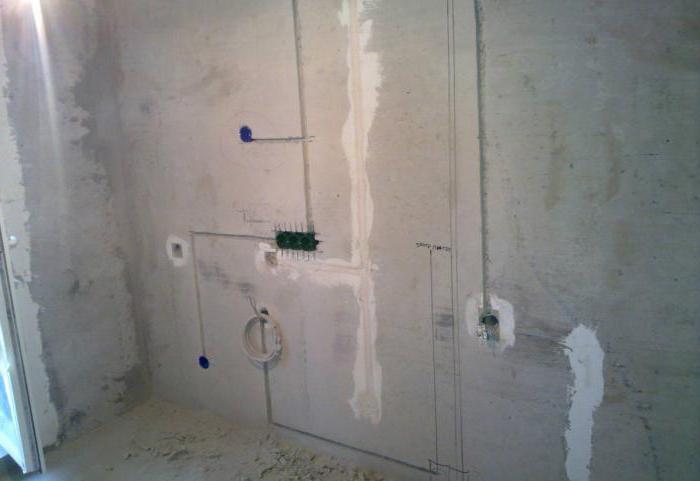
Consider a classic version of brick walls. Here the wires are most convenient to fix with clips that are driven into the walls by the usual hammer. For junction boxes, a special crown with winning teeth is made in the deepening wall. After chosen in the junction boxes of all chains, each group is checked by a multimeter or other dialing device.
With a positive result, bare contacts on the entire electrical wiring scheme are insulated, the distribution boxes covers close. Subscribers are fixed in their nests, the network is definitely de-energized. Walls and wires are attached.
In a private house, if you know the exact location of the wiring, you can not cut the wire, scoring a dowel for a wardrobe or shelf. In places of sockets, lighting lamps, switches left 15-20 cm longs for cutting and connecting. After complete wall decoration, you can install switches, outlets, hang chandeliers and other lighting.
Wiring. Video
Pro features of the electrical wiring in the house will tell this video. Taking on the weapon of delivel tips from here, you can start the gasket on your own.
In this text, it will be about how to equip wiring in the house with their own hands, as well as schemes and wiring will also be considered. Some time ago, the load on the mains of cities and villages was insignificant, but in modern world The load on the power grid has become much higher.
Nowadays, people enjoy such high-power household appliances like multicookers, washing machines, dishwashers and other similar devices.
The main thing is to consider the details such as junction boxes, switches, counters and sockets should be in the quick access zone.
It is necessary to know that Russian standards are very different from foreign standards, which means that foreign wiring schemes cannot be used in our country. The entire electrician in the house is planning at the initial stage, for this draw and point to it, where switches, sockets, etc.
At this stage it is very important to create a scheme where the location of the instruments will be indicated.
The next step will be an indication of places of laying of wires in the house.
After all the above manipulations, make wire wiring.
There are three types of wiring and connections. :
- Consistent;
- Parallel;
- Mixed.
A more economical option is considered mixed.
To facilitate their work make the load distribution. For example:
- Rooms, corridors and kitchens;
- Lighting and toilet;
- Sockets in rooms and corridors;
- Sockets in the kitchen.
This option is a simple unloading of consumers of electricity and the fewer groups, the more economically the material is consumed. In order to simplify the wiring laying, its installation is made fired in the slabs of overlaps. In the scheme, such a laying of wiring is noted by a barcode dotted lines.
 Calculation of current consumption
When conducting wiring, it is necessary to take into account the strength of the current, which should flow over the network, that is, this is the ratio of the total power of all consumers to the voltage. In homes and apartments, the maximum current consumption does not reach twenty-five amps.
All materials need to be selected by this parameter. The current secession depends on the strength.
If you have calculated that your consumption current is 16 amps, then the fuses cannot be installed with the same trigger current value.
It is necessary to take a greater standard value than the calculated one.
Wiring electricians in the house do it yourself
 For installation of wiring with your own hands, you need to know what you need, apply the cable. After all, it is made with different sections, it is chosen based on the current parameters.
At this stage you will need to calculate the number of materials that may be needed for the installation of electrical wiring. Such works as a project preparation, wiring, installation is quickly, but there is some complexity in counting the amount of wire required for wiring. But the measurements can be made by taking roulette for this.
Making measurements, add extra four meters just in case. Before entering the structure, the lighting shield is installed and all the wires from the house must be brought to it, as well as automata installed in it. Machines must have a trigger current in 16 or 20 amps.
Electric stove must be connected to a separate machine. Also, do not forget to calculate the number of outlets and boxes, it will not be difficult to do, because everything is located in the scheme.
For conducting electrical wiring, you may still need tips, tapes, various tubes, boxes, thermal insulation, cable channels and much more.
When you work, you will need the following tools:

When replacing old wiring, a special sensor is required to detect it. To lay wires on the walls make marking. The next step after the layout of the cable location is placed the location of sockets, shields, boxes, switches.
 First with a perforator with a nozzle drill special holes for sockets, boxes, switches.
In order to pave the wires, in the walls make special grooves make them with
By repairing or construction, many apartment owners are asked about how to properly place switches or sockets in the apartment. After all, it depends not only for the convenience of using them, but also safety of operation, and, therefore, health.
In order to deal with this question correctly, we consider the rules of their placement in the nearby past and new, which came from other countries, trends.
Old traditions
In Soviet times, it was customary to install lighting switches in residential premises near the entrance to them at the height level of an adult or place under the ceiling. And the outlets were mounted in the wall at a distance of 90-100 cm from the floor.
An example of placing the ceiling switch in the corridor. To control the light to a mechanical spring-loaded lever hidden inside the case, cord is tied. With the first tension, the light lights up, and with the second - goes out.

Wall switches have placed at around 160 ÷ 180 cm from the floor. This distance was considered the most suitable, optimal for light control. An example of placing a block of switches between the doorway demonstrates the photo.

The following picture shows the location of the socket in the room along the old rules.

Now the inhabitants of many apartments have been exploiting wiring with this location of switching apparatuses, they are accustomed to it, consider the norm.
New Time Lights - Eurostandard
In fact, the term "Eurostrotard" is now often used, but in the question under consideration, nothing particularly specific determines, as it came to us from neighboring countries together with the concept of "renovation", is intended for a complex of settlement of structures in construction and protection of them in the interests consumer.
Existing building standards, as well as rules in electrical installations, hard limit the height of the placement, the number or location of sockets and switches in residential areas. They only give general recommendations, negotiating dangerous premises and methods of installation in them in compliance with protective measures.
In the kitchen, the smallest distance from the electrical appliances, including sockets and switches, to gas equipment (plates, gas pipelines) must be more than 50 cm.
Inside the bathrooms, it is permissible to install sockets in zone 3, which is limited to a distance of 60 cm from the sink, bath and other water equipment. GOST R 50571.11-96 determines the rules of application in such premises of protective devices: differential automata, RCD, separation transformers.

Therefore, choose the location of the electrical sockets and switches is necessary, taking into account the convenience of using them, and not only by the traditions established in the past time.
For each room, before conducting electrical work, it is necessary to make a sketch, a plan-scheme on the scale of furniture and electrical appliances, mark the locations of the electrical network on it, including low-current chains: telephone, television, alarm, and other devices.
It is important to provide a small stock of these places for future equipment. Practice shows that it is justified.
Outlet location
They are for equipment of a stationary location, such as television, computer, washing machine, freezer ... It is necessary to have free access to them, but it is advisable to hide behind the instruments themselves.
Periodically used sockets are taken for design purposes at the same height of the floor, usually this distance is chosen about 30 cm. They are less noticeable in this case. It is recommended to choose the amount of them so that it is convenient to use the vacuum cleaner and portable electrical appliances in all rooms.
The electrical outlets above the desk, the bedside tables are placed above the furniture surface at a height of 10 ÷ 20 cm.
Location of switches
They are recommended to mount on the wall near the entrance door from the handle side at a distance of more than 10 cm from the opening and an altitude of about 90-100 cm. This location is convenient for adults: it is not necessary to raise your hand high. And children aged four years can already use the lighting themselves.
Ceiling design switches with lowered cord for control are still used in room design.
The type of room and its purpose also need to be considered to set the switches. In the long corridor at its ends, you can install two passing switches to control by one lamp. At the entrance to the near-locked rooms, you can put a block of several switches to control light in separate rooms from one place.
In the bedroom it is convenient to place switches so that they can be turned off the lighting, without getting out of bed, a simple raising of the hand.
In most cases, the installation of the floor sockets from the floor for 30 cm and the switches by 90 cm is considered universal. If you are not sure in the future location of furniture or electrical appliances in the room, then feel free to use this method.
How to plan placement of sockets and room switches
To compile a working sketch of the arrangement of electrical appliances and furniture, use the general recommendations shown in the picture below.

Inside the corridor it is convenient to place:
a branch box for switching cables.
apartment distribution panel with protective machines;
electric meter (it is possible to install in the apartment shield or separately, depending on local conditions);
switch or block of them;
The picture below shows one of the possible installation options for the electrical appliances in the corridor.

For the bedroom, the option of placing sockets and switches from two sides of the bed is shown in the following figure.

Bathrooms and showers for electrical safety due to high humidity require special attention. The placement of the sockets, the fan and the remote control buttons of the electrical appliances demonstrates the following plan.

The following scheme shows the installation of electrical equipment in the kitchen, taking into account the location in different places of outlets for exhaust, gas stove and electrified dishes: multicookers, electric kettle, pressure cooker, bread makers ...
Here the height of the installation of the socket over the table may vary depending on its height. It is convenient to install it so that it rises above the furniture surface by 10-15 cm. Moreover, for modern cuisine, it is better to use a non-single electrical outlet, but a whole block of them.
In the article we will tell about how the electrician is being done in the house with their own hands, the layout scheme will also be considered. If a couple of decades ago on the electric networks of cities and even the load of the load were minor, then today the picture is reverse. A lot of high-power household appliances are washing machines, multicookers, split-systems, and so on.
The load on the electrical networks increased many times. And if urban has some stock, then there is no such thing in the private house, therefore, the increase in the load leads to the fact that the wires do not stand and begin to collapse. Consequently, there is a question that the electrician in the apartment and the house should not only be repaired, but also change completely.
Previously, we did the wiring in the houses by the simplest scheme - on the switch and the outlet for each room, and in modern conditions it turns out too little - you want to turn on the charge, and the laptop, and the TV, and so on. To independently make wiring in the house, you need to know certain rules and standards that should be adhered to when installing. You will also learn how the wiring diagram is made, how to make it your hands right and the requirements for it.
Regulations
Building materials and all the activities of builders are regulated by certain rules and requirements, they are called GOST and SNiP. The rules of electrical installation devices are also used to electrical wiring in homes and structures (in the future PUE). It is this regulatory document that prescribes all the requirements for electrical equipment, thoroughly indicating what to do with it and how. The entire electrician in the apartment and the house with their own hands is connected to the voltage only after all checks are performed for the presence of short circuit.
Wiring Requirements in private houses and apartments

In the event that you decide to independently make wiring in your home, you must carefully examine all the requirements for it. But the main attention should be paid to the following points:
- The main components of the electrical wiring (cords are distributed, switches, sockets, counters) must be made easily accessible. Pretty simply mounted wiring in the house with your own hands. Electrician, however, demanding from the point of view of security. But all the rules can be easily observed.
- PUE switches should be performed at 0.6-1.5 meters from the floor surface. And you need to pay attention to the fact that when opening doors, they should not create an obstacle. For example, if the door opens to the right, the switch must be left on the left. And if the door opens to the left, the switch is mounted on the right. The cable must be laid on the switch from above.
- Outlets are mounted at 0.5-0.8 meters from the floor surface. The fact is that at such a level it is necessary to have it for security purposes when flooding at home. Moreover, from gas or electric stoves, radiators of heating, pipes (and other objects having a ground) should be held the distance is not less than 0.5 m. To all rosettes of the wires go upwards. This is how it is done with your own hands. Wiring schemes are shown in the article.
- For every 6 square meters. m. Room area should be one outlet. An exception is a kitchen, which is mounted as much outlets as needed (based on the number of household appliances located in it). In the toilet is prohibited from the installation of sockets, but in the bathroom is allowed only if there is a junction via a transformer (220 volts are fed to the primary winding, and the secondary is removed as much). The transformer is installed outside the bathroom.
- Before starting work, it is necessary to make a plan of wiring, clearly designate its location in the walls. Please note that all wires should be located either horizontally or vertically - but not diagonally or by broken. So the wiring in the house should not be made. The connection diagram of all devices should take into account this feature.
- From overlapping, pipes and other obstacles should be a certain distance. For example, from the beams you need to withstand a distance of 5-10 cm, from the cornices - as much. From the ceiling you need to withstand about 15 cm, from the floor - 15-20 cm. If we are talking about vertical surfaces, then from door and window openings at least 10 cm must be. But between the gas pipe and wiring you need to withstand the distance over 0.4 m.
- External or hidden wiring should not touch the metal parts of any structures.
- If several wires go parallel, the distance needs to withstand over three millimeters between them. Alternative option - to hide each wire into a protective box or corrugation. So the electrician is mounted in the house with their own hands. Schemes should be drawn up with this.
- Connect and breed the wires follows in special distribution boxes. All the places of connections need to be carefullyroidered, and one must consider one feature - it is forbidden to connect copper and aluminum wires. If you make wiring from the copper wire, then make it all of it, there should be no sections from aluminum.
- Grounding (zero wires including) must be fixed to all devices using bolted compounds.
These requirements request all the electrics. It is possible to draw up the compound schemes with your own hands, only if you consider all these rules and norms.
Wiring project in the house

First of all, you need to create a project of electrical wiring, it is from it that all begins. From him you will be repel in the future when making installation. Of course, it will be much better if you have experienced technicians who do not have this business. But if you have experience, dare.
But note that on how the project is made, your safety depends. You definitely need to know which conditional designations are applied in the preparation of schemes and projects. It is worth noting that Russian standards are quite different from European or American, so do not use foreign schemes in the conditions of our country. The entire electrician in the house is designed (schemes are shown in the article) at the initial stage.

Draw a plan at home or apartments, mark places on it, in which sockets, switches, chandeliers will be installed, etc. On the number of electrical appliances, it was said slightly lower. At this stage, the main goal is to create a scheme on which all installations of the instruments will be indicated. The second part is to outline the place of laying of wires around the apartment. Of course, you need to know in which household appliances will stand.
Wiring wiring
Then make the wiring of all wires. And if the creation of a scheme with the location of consumers is a simple case, at this stage of work it is worth staying in more detail. You can use three types of connections and wiring:
- Consistent.
- Parallel.
- Mixed.
The most attractive from the point of view of material savings is considered the third.

Electrician is done in the house with their own hands (Mixed type schemes) with the highest possible efficiency. To make it easier for work, carry out ungroupling:
- Illumination of corridors, residential premises, kitchens.
- Bathroom and toilet (lighting).
- Sockets in residential areas, corridors.
- Sockets in the kitchen.
- Electric plate socket (if necessary).
Please note that this is the simplest option to group consumers of electricity. The smaller the groups, the less the materials will be spent. The above example is the easiest and most economical. You can complicate: literally to each outlet, for example, to supply the wiring. About how to carry out an electrician in a private house with your own hands, you begin to realize a little.

To simplify the wiring laying, it can be mounted under the floor (for outlets). In the case of top lighting, you can install in the slabs of overlaps. Ideal for the "lazy" method - it disappears the need to stick the walls and the ceiling. Moreover, on the plan-scheme, this type of wiring must be marked with dotted lines.
Calculation of current consumption
Be sure to consider the strength of the current that will flow over the network. For this, there is a simple formula: the current is the ratio of the total power of all consumers to the voltage (it can be said that this is a constant, since the voltage standard in our country is 220 volts). Suppose you have the following consumers:
- Electric kettle with a power of 2000 W.
- Tens of incandescent lamps, each 60 W (only 600 W).
- Microwave oven with a capacity of 1000 W.
- 400 W refrigerator.

Voltage in the network 220 V, the total power is 2000 + 600 + 1000 + 400, that is, 4000 W. Dividing this value to the voltage in the network, we get 16.5 A. But if you look at practical data, then in apartments and houses, the maximum current consumption is rare when up to 25 amps.
For this parameter, you need to choose all materials for installation. In particular, the current depends on the fact that you always need to take a stock in 25%. In other words, if you calculated the current consumption of 16 A, you cannot install a fuse with the same valuation of the operation current. You need to choose the standard value more than the calculated one.
Wire brands for use in homes

Now about how the electrician is mounted in the house. Cable (PUU rules regulate all its parameters) It is necessary to choose, based on the current characteristics. It is desirable that in the house or apartment wiring was made from such materials:
- Wire brand VG-5x6. This wire consists of five lived, each has a cross section of 6 square meters. mm. It is widely used for homes having a three-phase network to connect the lighting panel with the main one.
- VG-2x6 has two veins with a cross section of 6 square meters. mm. It is widely used for single-phase houses to connect the lighting shield and the main one.
- Wire of the VG-3x2.5 brand has three veins, each cross section is 2.5 kV. mm. It is used to connect lighting shields with distribution boxes. Also from boxes to sockets.
- The brand VG-3x1.5 has three veins, each cross section of 1.5 square meters. mm. Used to connect switches and lighting lamps.
- Three-core brand, the cross section of each 4 kV core. mm. Used to connect electrical stoves.
Calculations of the number of materials

Now you consider from which components (including small) consists of wiring in the house. DIY project, wiring, installation, is performed quite quickly. True, you have to pretty try to count the amount of wire as close as possible. For this, according to plan, go around the apartment with a tape measure. After performing measurements, add four to the meter from above - there will be no excess.
At the entrance to the house, all the wires are made from the house suitable for it. It uses automatic switches. Note that the machines must have a maximum trigger current of 16 or 20 amps. Must connect via a separate circuit breaker. With power up to 7 kW, a 32 A machine is used, with a greater - by 63 A.
After you consider the number of junction boxes and sockets, there is nothing difficult in this business, it is made according to the scheme prepared earlier. In the future, you will need various "little things", for example, insulating tape, tips, tubes, cable channels, boxes, thermal insulation, and others. Now it is worth talking about what tools the installation of wiring is carried out in the house with their own hands. The scheme is considered quite detailed.
Tools for work

When conducting always adhere to safety regulations. In order not to get confused, it is better to do it yourself, if you have a partner, then help should be minimal - feed, bring, do not bother. You will need the following tool:
- Multimeter.
- Perforator.
- Bulgarian.
- Screwdriver.
- Pliers.
- Lubes.
- Figure and flat screwdriver.
- Level.
If you repair in old apartment And in parallel, change the wiring, you need to stretch all cables so that they do not interfere. For this work, a special wiring detection sensor is useful.
Marking of the location of the wires
On the wall, apply the labels for which you will lay the wires. Pay attention to whether the rules are configured by the position of the wires. After planning the location of the electrocabels, you can designate outlets, boxes, shields and switches. Note that there is a niche in new apartments for the installation of a shield. And in old houses, the shields are simply attached to the wall.
Strobing of walls
First of all, you install a special nozzle on the perforator and drill holes for installing distribution boxes, switches and sockets. To lay the wires, you need to do in the walls of the groove - the shoes. They are done with the help of a grinder or puncher. Whatever the way either chosen, dirt and dust will be enough. The groove should have a depth of 2 cm. As for the width, it should be enough to put all the wires. As you understand, the wiring of electrical wiring with their own hands is simple, it is more difficult to make installation from a physical point of view.
A separate story with the ceiling. If you plan to do mounted, then all the wires simply install on the overlap. This is the easiest way. A little more difficult - to make a shallow stroke. And one more thing - hide in the overlap. For example, the panel houses use such overlaps in which there are internal voids. Therefore, there are enough two holes to pave the wires. And the latter is the penetration of holes in the corners of the rooms to bring the wires to the central shield. After you start closed (you will have to stick the walls) or in open ways.
Conclusion
The most important thing in the installation of electrical wiring in homes and apartments is to adhere to all the rules and rules for GOST, SNIPU, PUE. So you will not only be able to achieve maximum efficiency from electrical wiring, but also reliability, durability, and most importantly - security. And try to apply only quality materials when installing. For example, the wires are desirable to use copper - they have a lot more service life (better conductivity, less heated).