House for a cat out of the box. Do-it-yourself house for a cat (how and from what to make, photo)
Cat lovers cherish their pets. Every owner wants to give their cat the very best. For pets, you need to purchase many different items, including beds. There are many specialty stores for animals. But not everyone can afford to buy expensive things for pets.
What is a cat bed and why is it needed
A bed (bed) for a cat is a place where a cat will sleep (rest). A bed is sometimes called a bed. Such beds are usually installed next to or scratching posts. After all, the pet must understand where its territory is located. The bed should be in a warm and dry place. In addition, the chosen place should be cozy. If the cat does not like the bed, she will choose another place to sleep and rest, and the bed will remain untouched.
The bed should be comfortable and cozy
When choosing a bed, you need to consider the preferences of the cat. If the pet chooses soft places to sleep (sofa, armchair, etc.), then the bed should be soft. If the cat likes to sleep on your fur coat, then the bed should be fluffy. In addition, it is important to consider the place where the animal likes to sleep. So, if the cat likes to sleep, for example, under the table, then the purchased bed can be placed under the table. Later, when the cat gets used to its bed, it can be moved.
We have a store bed and, but the cat sleeps under the bed and you can’t lure him out of there with any gingerbread, a favorite place, and even a bathroom.
Anyuta, cat owner
http://m.woman.ru/home/animal/thread/4278589/
Types of beds and their features
There are several types of beds
Beds that are sold in stores differ in color and size, shape and price. But these are just visible differences. In fact, each type of sunbeds has its own characteristics:
- Bed-baskets (basket with a pillow). Well ventilated, but cats love to gnaw on the bars of the walls.
- Plastic beds (plastic frame and pillow). Comfortable because they are easy to clean.
- Bed-bagel. A kind of pillow (may be with or without sides). Bagels are sewn from soft materials. This will have to be washed entirely (or pull out the filler before washing).
- Beds-hammocks. Hammocks are installed at a certain height from the floor. Cats love these cribs, but kittens or older cats can be uncomfortable climbing up.
- Closed beds. These are beds in the form of a house or a hut. Cats love to feel protected.
- Beds - tubes. These are tubular beds. Such a bed can be lined with warm fabric both inside and out. The advantage is that it can be installed in the form of a suspension to the battery.
Some cat owners choose a cat bed based on the design of the apartment as a whole.
How to make a do-it-yourself cat bed
If it is not possible to purchase a store lounger, you can make it yourself. In addition, a homemade sunbed will be exactly what you want. Moreover, when making a bed, you can use exactly the material that the cat likes (fabric of a particular item, cardboard from a favorite box, etc.). When choosing a material, you need to consider not only your capabilities and preferences, but also safety. The material must not be toxic. To make a pillow base, it is best to use cotton (or semi-natural, cozy) fabric:
- coarse calico;
- jersey;
- velveteen;
- denim;
- knitted fabrics;
- corduroy (plush) or other fleecy materials.
How and where to make a hammock
A hammock is a bed in the form of a canvas attached at the corners (or around the circumference) to the base. The outer side of such a bed should not touch the floor.
cats like hammocks because of the height better review rooms
The hammock can be placed anywhere your pet is comfortable. It is best to put a hammock where your cat likes to sleep. It is important to consider the height of the hammock. Ideally, if the height can be adjusted. Not every cat will be able to climb to great heights.
My cat Hosya used to love to sleep in the hood of her jacket (hanging in the corridor at a height of about 2 meters from the floor). From this, white hairs are on the blue hood. To wean the cat, I had to unfasten the hood and put it on a chair that we don't use. Gradually, Khosya got used to the chair, and I was able to remove this hood. Now she doesn't even remember him.
To make a hammock, you need to take the canvas on which your pet sleeps and attach it, for example, to the legs of an overturned stool. Some, before hanging, sew a pillow from this fabric. And sometimes (more skillful owners) make a frame of PVC tubes. True, men can handle this material better. And you can also attach this pillow instead of the seat of a folding chair. In this case, it is not necessary to specially train the pet, since he will not give up his favorite rag.
It is important that the bottom of the hammock does not sag too much.
Tip: To avoid having to retrain your cat, do not wash the fabric before the cat lies down on the hammock. Let it lie on it for a couple of days to get used to the new device. Cats smell their own, and if the bed smells like laundry detergent or conditioner, the cat may reject the new bed.
Do-it-yourself cat bed from improvised materials
You can make a pet bed with your own hands. Each apartment has the necessary materials, you just need to look. The laziest option is to take the pillow on which the cat sleeps and place it in the half of the suitcase (case, diplomat). The main thing is that the suitcase fits in size. You can also arrange a cat's bed in a car tire. In an overturned tire you need to put solid foundation(plywood, board, etc.). Place a pillow on top. In such cases, you can decorate the couch at the request of the owner. More "handy" owners build a bed for a pet from bathrobes or fur coats (most often from sweaters). In this case, the sleeves become sides (you don’t even need to cut).
A couple of years ago, my apartment was renovated. From this, the cat could not "find a place for itself." She hid in corners and climbed into rolled carpets. I realized that she liked the smell of the carpet (the usual smell of home and wool). I chose an “older” rug and built a wigwam (cone) out of it. The edges were fastened with a regular stationery stapler. She put a folded terry towel inside the wigwam. So we survived the repair and the next winter. But this hut did not fit into the new interior, and later we abandoned it.
Photo gallery: examples of improvised beds
A bed from a sweater (sweatshirt) can be made in half an hour to make a bed from a suitcase, you can use any of the halves of the suitcase, but so that the wall lying on the floor is flat, such a bed is good because you can make a canopy (by attaching the canvas to the legs of the table ) the basket can be attached with the bottom to the wall or installed on the floor, in addition to the case from the TV, you can use the box from the microwave oven, monitor, etc. such beds are convenient because you can adjust the height
How to sew a do-it-yourself cat bed
Most often, cats choose soft surfaces as beds, so the owners try to make the same soft bed (bagel). To sew such a lounger, you need to choose the material:
- fabric for the upper part of the donut (sides - 1.20 x 0.20 m., base - 0.40 x 0.60 m.);
- fabric for the lower part (0.40 x 0.60 m.);
- stuffing material (can be pulled out of an old padding jacket).
Listed are approximate measurements for a medium sized cat (they may be smaller or larger). When the materials are prepared, you need to cut out two parts. When cutting, do not forget about the seam allowance (1 cm on each side).
You need to cut out 2 parts A and 1 part B
You will have two parts A. They need to be sewn (stitched) together along the edge that has a notch. Then you need to connect the narrow sides of the part. Next, you need to turn the resulting part out and stitch the free edges so that you get a rim (do not forget to leave a hole for stuffing). After the side is stuffed with padding polyester (or foam rubber), the hole can be sewn up. Now you need to sew this board to the top (detail B). This is the base of the bagel. The base must be sewn to the rounded seam (usually this is a coarser fabric). Here you also need to leave a hole, and after stuffing, sew it up. As a result, there will be one outer seam. It can be crocheted, overlocked, sheathed with an oblique trim, or left as is. If the fabric for the donut was not purchased on purpose, then you may be unhappy with its pattern (its absence). In this case, you can paint the fabric before sewing.
The drawing took quite a long time (but carried away). First, I made prints: I cut out the cat's face from porous rubber from an old armpit rug. I dipped this signet in acrylic paint and made a drawing. And it can be easier - through a stencil. Do not forget to put newspaper under the fabric, because the paint penetrates the fabric. Then I drew eyes, mustaches, etc. with a gel pen for each face. (This is of course optional.)
When completely dry, turn inside out and iron (to fix the paint). After the paint should not be washed off. All this was not done in one evening.Maxa, creator of the patterned bed
For those whose cat “choosed” the material for the sunbed, there is another way. For sewing a couch you will need: an old sweater (jacket, jumper), scissors, a needle, thread, stuffing.
Any sweater can be used (the main thing is that the cat likes it)
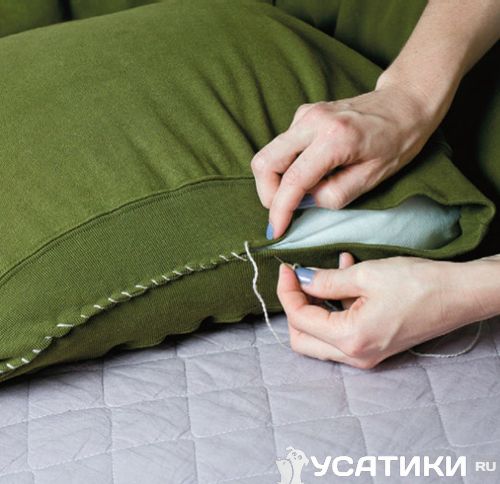
The neck of the sweater can be cut off and sewn up or rolled up. After that, you need to lay 1 horizontal seam along the chest (from armpit to armpit). From cuff to cuff, it turned out to be a tube. It needs to be filled with padding polyester (or other suitable material).
It is better to use threads of the same color as the material (so the seams will be less noticeable)
The sleeves must be joined together at the cuffs. You will have a circle. Sew the sides of the sweater to this circle so that the panel turns out to be flat. You need to leave the bottom of the blank (bottom of the sweater) unsewn. Through this hole you need to put a finished pillow or padding polyester.

If the corners of the sweater (elastic belt) stick out from under the bed, they can be cut off (but not under the spine, but with an overlap (1.5 - 2 cm). So that the edges of the cuts do not “fuzz”, they need to be tucked up and hemmed .
Do-it-yourself knitted bed for a cat
Some cat owners do not know how to sew, but love to knit. In this case, you can knit the bed with knitting needles or crochet. To do this, you need to prepare a tool (knitting needles or a hook) and yarn (threads). Yarn can be any color. The lounger can turn out to be plain or with a pattern. It all depends on your preferences and patience. In general, knitting is the most painstaking and painstaking way to make a bed. But on the other hand, the finished device will be one of a kind.
If you knit with knitting needles, then you can separately knit the details of the same shape as the patterns, then connect them and do not forget about the stuffing. If you crochet a device, then the situation is different. You can crochet any round lounger (bagel, ball, egg, etc.). We will consider a bed-house. Such a product is knitted in one piece. To do this, you will need a hook (N° 7 or N° 8) and yarn (you can buy a new one or use leftovers). You need to start from the foundation. Knitting takes place in a circle:
- Cast on 3 air loops (ch), close the chain into a ring using 1 connecting column (ss). The rows will begin with one ch rise and end with ss.
- 8 single crochet (sbn) we close in a circle.
- Increase x 8 (16).
- (sc, inc) x 8 (24).
- (2 sc, inc) x 8 (32).
- 32 single crochet.
- (2 sc, inc) x 8 (42).
- 42 single crochet.
- (2 sc, inc) follow the sequence until the end of the tier (56).
- 56 single crochet.
- (2 sc, inc) follow the sequence until the end of the tier.
- Single crochet in each loop of the previous tier.
- (4 sc, inc) repeats until the end of the tier.
- 13 - 16 rows single crochet in each loop of the previous tier.
- (5 sc, inc) and so on until the end of the row.
- single crochet in each loop of the previous tier.
This will turn out the lower convex part of the sunbed.
The bottom of the bed should turn out to be flat, and the walls should be slightly convex.
- We knit half a row of sc in each loop, cut the thread, leave the end (this is the 19th row).
- We perform sb in each loop, and when only 5 remains, we knit the tail left over from the previous row, we break the thread.
- Next, 10 single crochets - a pass, we start knitting from the place where the previous row began.
- We knit the remaining ends of the threads into the main fabric to give the product an aesthetic appearance (20th row).
- Repeat the 20th row five more times (21-25 rows).
The "window" is formed in 7 circles.
It is important to ensure that there are no protruding loops and puffs
When the round entrance to the workpiece closes, the number of loops in the circle will decrease. Here you need to knit according to the scheme:
- 6 row we knit sc in each loop (hereinafter kp.) Of the previous row, we close the row after knitting 8 loops over the entrance.
- 27 - 30 rows (sc in cp, reps until the end of the circle).
- (4 sc, dec) repeat to the end of the tier.
- 32 - 33. sc in kp, repeat to the end of the row.
- (3 sc, dec) repeat to the end of the tier.
- sbn in kp, repetitions until the end of the tier.
- 36 - 37 rows. (3 sc, dec) repeat to the end of the tier.
- 38 - 39 rows (2 sc, dec) rep until the end of the circle.
- 40 - 41 rows. (sc, dec) and so on until the end of the tier.
Here the circle must be closed. If there is a hole on top, then somewhere you missed a decrease or made an extra yarn. Rate the product. If the shape of the lounger is beautiful and neat, then continue to decrease until the circle is completely closed. The end of the thread must be tucked in. If desired, the lounger house can be decorated with additional elements or a ribbon can be passed along the body.
Video: how to knit a cat cushion
It is very important to take care of the comfort of your pet, in particular, to prepare a soft place for him to sleep. This is especially important for cats, as they prefer to sleep. most day and need a cozy quiet corner to relax. To avoid unnecessary costs and make your pet pleasant, a do-it-yourself cat bed from a sweater will be just right.
This is not as difficult as it might seem at first glance. In addition to a sweater, various fabrics, faux fur, other old knitwear, used clothes, and more are suitable for a couch. A cat bed can be equipped with your own hands from an ordinary cardboard box. Below are various do-it-yourself cat beds, their patterns and photos of finished products.
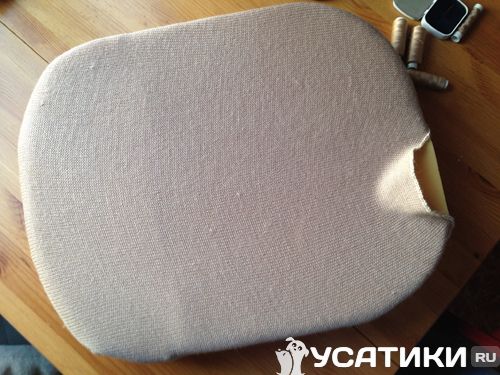
One of the master classes will demonstrate how to sew a cat bed with your own hands from improvised means. This bed has a simple oval shape, small sides with soft filling and a removable pillow as a bottom. In case of soiling, the pillow can be easily removed and washed, so the product is very practical and will definitely please the cat.
For tailoring you will need:
- dense natural fabric;
- synthetic winterizer as a filler;
- pattern paper;

It is not recommended to use a smooth sliding fabric, as the pet can catch on it with its claws, which will cause him discomfort, and the material will quickly fray over time and the bed will not take on the most presentable appearance.
For a pattern, absolutely any paper, newsprint or cardboard is suitable. However, you can sketch out the outline of the desired product with a bar of soap, but on a light fabric it will be difficult to see. The size of the bed depends on the size of the cat. In this case, the pattern turned out to be 40 × 55 cm.
The resulting template is applied over the fabric and grabbed with pins so that the fabric does not move to the side, and then the base of the future product is carefully cut out along the contour. In total, 4 such blanks will be required.

First you need to sew the bottom for the bed. To do this, take two blanks, put them together with the right side inward and sew. It is important to step back from the edge by about 1 cm and leave a small hole for filling with padding polyester. For convenience, you can grab the details with pins and sew on a typewriter.

A synthetic winterizer is inserted in a thin layer inside. Then the hole is carefully grabbed with pins and sewn on a typewriter. To keep the product better in shape, you can additionally stitch it around the entire circumference.


First, you should measure the diameter of the bottom of the future couch and add at least 10-15 cm to this value, so you can calculate the length of the sidewall. In this example, the prepared piece of material has a width of 40 cm and a length of 155 cm.

In the next step, one of the edges of the fabric is folded over by 1 cm, for convenience, grabbing it with pins. Then this edge is applied to the opposite one, stepping back 2 cm from its end, and again fixed with pins on the sides.


Next, you need to stitch the fabric on a typewriter and fill the resulting sides with padding polyester. At your discretion, you can use another filler. It is not recommended to stuff the product too tightly, as it should be slightly airy.
Then, using a ruler and a pencil, measure 16 cm squares.
According to the pencil markings, cross seams are sewn. Thus, the sides take shape, but this is not necessarily an action. If desired, you can leave them smooth and oval.
The free edge at the sidewall should be folded over and pinned to make it easier to sew.

Finally, the side is sewn to the bottom, and its free folded edge is located under it. It is important to make sure that the formed side fits snugly against the bottom of the couch, does not deviate to the side. It remains only to close it, gently bend the edges, put them into each other and sew. It is recommended to knead the product a little in order to evenly distribute the filler.


In general, the couch is ready, but this model also has a removable pillow. For its manufacture, previously prepared two oval pieces of fabric of the same size with the bottom of the bed will be required. With the help of pins, it is necessary to outline the outlines of future seams. You can also do this with a pencil and ruler.


Each sector is tightly stuffed with padding polyester. Then the pillow is stitched around the entire circumference with a zigzag seam.

To make the product more attractive, its edges are slightly tucked and stitched with the same seam. The pillow for the couch is ready. Now you can invite the cat for the first test.


Bed from old knitted clothes
How to make a cat bed from woolen knitwear and a foam base, the following will demonstrate step-by-step instruction. This bed is very dense and warm. What you need for your pet in the cold season or rainy day.

To make this cat bed you will need:
- woolen knitwear (any worn clothes will do, in this case a skirt was used);
- woolen scarf approximately 30x200 cm;
- 2 foam pillows measuring 35x80 cm;
- improvised stationery.

First, pillows should be used to make the basis for the pet's sleeping place. Using a marker and a ruler, the first foam rubber element is divided into two different halves and carefully cut with scissors.


As for the second pillow, it is also cut into two equal halves, but not across, but along. Thus, the first pillow will serve as the basis for the bottom, and the second for the sides of the product.


The size of the bed will depend on the size of the cat. You can focus on the size of the cat bed from the previous master class. All excess should be cut off. To make the beds look more attractive, it is recommended to round the edges. To maintain symmetry, you can use any rounded object, for example, a plate. Attach it to the foam rubber and circle it with a marker.
It is worth noting that the shape of the bed can be set at your discretion. It can be oval, rectangular with rounded edges or completely round. The main thing is that the pet is comfortable.

According to the size of the bottom, two parts are cut out from the former knitted skirt. They are easily stitched together by hand. It is important not to forget to leave a hole through which the workpiece can be turned out and the foam cushion placed there.
When the foam rubber is placed in the resulting cover, you can sew up the hole. The edge of the material is neatly folded to the side and hand-sewn with a blind stitch. On this work with the bottom of the couch is completed. It remains to sew a side.

First, fold the scarf lengthwise and stitch it. The resulting pipe is carefully filled with oblong pieces of foam rubber.
Then, based on the size of the bottom, the outlines of the side are formed. To connect, one of the edges of the sidewall of the couch is overlapped on the other and sewn together with a blind stitch. It is worth noting that on the one hand it remains empty by 15-20 cm, so nothing prevents you from closing the side in this way, since excess foam rubber will not stick out, violating the aesthetic appearance of the product.

It remains only to put the bottom of the couch in the formed ring and sew them together. You can invite a mustachioed expert to evaluate the work done.

Sweater bed
The next option for making a cat bed is quite simple and budgetary, but the end result is no worse than a product made from expensive materials. You can sew a cat bed with your own hands from a sweater, the patterns of which are presented, filling it with synthetic winterizer. Sewing it is not at all difficult even for an inexperienced person in this field.

To sew a bed you will need:
- sweater, mostly without a high collar;
- a small dense piece of fabric about 20 × 40 cm;
- synthetic winterizer in its pure form (to simplify the task, you can put a pillow stuffed with synthetic winterizer on the bottom);
- sewing accessories.

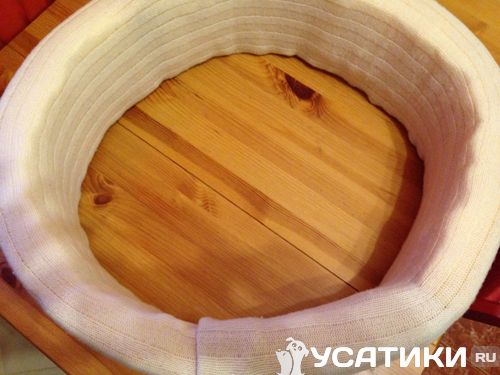
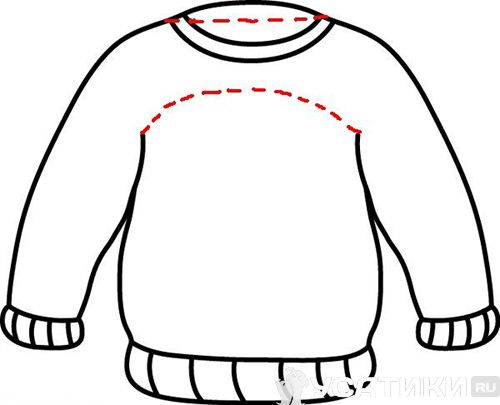
In the event that the sweater has a high collar, it should be cut off, slightly wrapped and stitched around the edges so that it cannot unravel. For sewing, it is recommended to use nylon or woolen threads, they will provide the most durable seams. It is better to choose the color in that sweater, so as not to focus on the seams.
Based on a small diagram, it is necessary to sew up the throat of the product and sew a semicircle above the level of the chest. Thus, the sides of the future couch are designated. To prevent the stitches from moving out, it is recommended to fix the area with which they will work with pins.

Then a pillow is placed inside the sweater and the hole is sewn up so that it cannot fall out. The bed bottom is ready. If there is no such pillow, you can fill the product with an ordinary synthetic winterizer, but then a lot of material will be required.
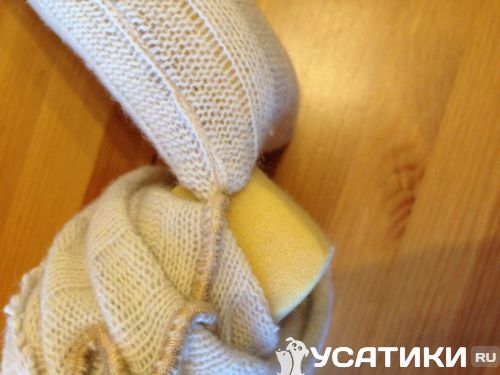
It remains to fill the sleeves so that they become dense enough, keep their shape and do not deviate to the side. In photo 40, the blue color indicates the area that should be well stuffed with padding polyester.
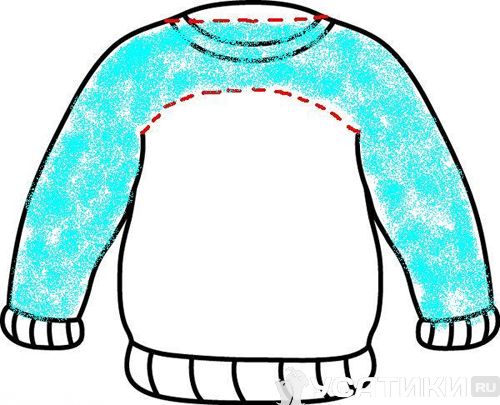
As the sleeves are filled, they are sewn in a circle to the bottom. It is recommended to sew on the sleeves one by one. In the place where the neck passes, it should be sewn along its contour, not allowing it to be visible on the finished product. This will break the aesthetics of the couch. The intersection of the sleeves should also be stitched and slightly stretch the side to evenly distribute the padding polyester.

The previously purchased fabric is wrapped around the junction of the sleeves, closing the seams, and the material is sewn with threads of a similar color to it.

That's all. The bed is ready for use.

Sofa for a cat
The next model of a bed for a cat has an original design. The lounger imitates a small cat sofa, sewn from simple fabric and assembled using fabric ribbons.

As mentioned earlier, the size of the product directly depends on how large the pet is. When sewing, you can use the pattern and dimensions indicated in photo 45 or experiment at your discretion.

You can choose the fabric to your taste or cut out worn clothes. In the example, fabric ribbons were used to match the blank, however, you can purchase colorful satin ribbons that will give the cat sofa an even more attractive look.
Two identical blanks are cut out of the fabric, mostly in contrasting colors. Then they are stacked on top of each other. As indicated in photo 46, a ribbon is threaded between each of the paired rectangles. Its length is not so much significant, but it is better that it be as long as possible than subsequently be short.


The future couch is stitched around the entire perimeter, leaving 12 cm from each end, so that it would be more convenient to fill it in the future.

Next, the product is turned inside out and generously filled with padding polyester. It is important to fill the sides tightly, as they must stand and keep their shape. Finally, the bottom is stitched strictly in the shape of a rectangle and all holes are sewn up. For relief of the bottom, you can stitch it a couple of times along.

It remains only to tie all the ribbons on the bows and the sofa bed is ready. You can call the cat to her new sleeping place. She will be delighted with such an amazing gift, especially made by the owner.

Cats are very fond of climbing into boxes, so a house made of a cardboard box is almost a win-win option!
Yes, and working with cardboard is quite simple.
We take a box and cut out a round entrance in the wall. To do this, you can use a flat plate as a template.

Trace with a pencil and cut out.

top boxes are used as a roof. Cut off the cardboard above the entrance and parallel to it. We connect the sides, it turns out natural ventilation in the house.
There is an even simpler version of the house. We cut out the entrance in the box.

On the wall of the box opposite the entrance, we cut out three holes for ventilation, and a small window on the side.

Put a pillow on the bottom. We fix the top of the box with a stapler. The house is ready in 5 minutes.

You can make a cat scratching post from improvised materials: we take a pipe - the base from paper towels and wrap it with twine. You can use hot glue to secure the ends.

An interesting version of the cat house is a T-shirt house. Several options can be considered.
Tools:
- 2 wires, 50 cm long,
- T-shirt,
- cardboard box,
- Scotch.
Take 2 wires and cross them together. We glue the joints with adhesive tape and isolate the ends so that the cat does not get hurt.

You should get two connected arcs that will regulate the height of the house.
Now we will deal with the base for the house. We take a box, you can use cardboard. In the corners we make four holes where we will insert arcs.

Carefully bend the ends of the wire at the bottom of the box and seal with tape so that the sharp edges do not show through.

It's time for the T-shirt. For aesthetics, you can unpick the sleeves and sew the armhole. We stretch the T-shirt on the frame so that the neck of the product is the entrance.

The larger the frame, the wider the T-shirt is needed.
If the length of the T-shirt interferes, then you can cut it off and make a pillow inside the house.
The second way. We take a cardboard box, put a pillow in size inside.

We fit the box with a T-shirt so that the cutout serves as the entrance to the cat's house.

Fold the bottom of the T-shirt neatly and secure with a stapler.

Push the sleeves inside the armhole. The easiest cat house is ready!
Plywood cat house
We take a sheet of plywood. And we make three sides and a floor out of it, it is better to choose a square shape.

For the roof you need two squares, which are connected at an angle by furniture corners.

We use self-tapping screws to connect the walls and the roof.

We cut out the entrance and the front sides of the roof from the foam.

In order to cut out the entrance, we circle the plate.

In the details for the roof, you also need to make small holes for ventilation.

From the inside, you can paste over with fleece or put a pillow.

We take foam rubber and cut it according to the pattern.

Parts are covered with fabric. We sew the sides.

What's good for cats is good for your dog!
Put a pillow inside.

More cat house ideas
I suggest to look interesting ideas cat houses for inspiration.
We use plywood and wood.

Cardboard house with a printed pattern.

Soft house with a scratching post.

Soft foam house.

Bed for a cat in a modern style.

I will be glad to your comments. What type of cat house do you like best?
1 80 281
Soon it will be a year since my mother got a cat, and I decided to make her a house for a cat with my own hands as a gift. Naturally, the first thing I did was go online and figure out how to make a house for a cat, and in the process of making a chic penthouse for my mother's cat, I made two friends happy with the houses - the houses turned out to be nice, but these designs simply could not stand the heat of our Lucky's passions.
Couch or playhouse?
Why and how to make a house for a cat with your own hands? I will give instructions below, but for now I will simply explain why a cat needs its own home. First of all, let's understand a little - it can be a couch and a playhouse. What exactly does your cat need? Only you can know about it.If you want, you can make a large combined structure, where there will be one or two beds, a play area, racks and other elements that the cat will be happy to play with. If you have recently adopted a kitten, then you should not make him a homemade house for growth - it is best to make a simple design that will protect your kitten from psychological trauma and fears.
You can make a good cat house with your own hands in many ways - read a few instructions, choose in our article which one you will make a house for a cat with your own hands and proceed.
Manufacturing instructions
If you want to quickly and easily make a cat house with your own hands, step-by-step instructions will help you. So what do we need?- Big cardboard box. The dimensions of the house depend on the size of your pet, but on average they should be at least 35 * 50 centimeters. How to make a house in height? the cat should fit in the house while standing, it should be comfortable.
- Glue, scissors and paper cutter.
- Soft upholstery - you can take foam rubber, you can use batting or soft voluminous fabric, an old blanket or an unnecessary blouse will do.
- Decorative fabric - it is better to choose natural dense fabric calm colors, you can use faux fur or bouclé fabric.
- If you find a box of the right size, then you need to prepare it (remove labels, clean with a stiff brush). If the box is larger or just sheet cardboard - open the box and assemble it.
- Draw a round hole on the end part - it should be large enough for the cat to comfortably crawl into its house. For example, you can circle a saucer.
- Next, you need to cut a hole with a cutter. If it doesn't turn out too smoothly, don't worry, just increase the diameter a little.
- Be sure to glue all the joints - the house must be strong and reliable so that the cat is calm and comfortable in it. It is best to glue with adhesive tape or ordinary glue - glue the parts of the box one to the other, and if necessary, glue the joints with strips of fabric or paper.
- Dry your product well before moving on.
- Cover the house with soft material. For these purposes, you can take superglue - the most common one will do. You can sew the fabric to the cardboard, but it is better not to use paper clips - it seems to me that the cat can accidentally start to gnaw and get hurt.
- After the house, pasted over with soft matter, dries up, proceed to the final stage - upholstery of the cat's house. First, make a pattern with a small margin and carefully glue the inside of the house. Try to make fewer seams. It is best to overlap the seams with a large margin, so you can do without working with a needle and thread.
- Sew a small pillow and an extra light blanket into the house. No, I do not think that a cat will hide in her cozy apartment, but from a small blanket a cat will make a cozy nest for herself.
First of all, decide on the materials. Many people think that only those who are greedy for money for finished products undertake to make a house for a cat with their own hands. Actually this is not true. Why does a person want to make a homemade house?
- The issue of saving, of course, is far from the last in matters of handmade cat houses. How much does a good cat house cost? About 12-20 thousand rubles. The amount is quite large, and not everyone can afford it. Of course, there are cheap goods on sale, mostly made by Chinese craftsmen. But most owners don't want to risk their pet's health.
- Question of original design. Some people want to have a unique piece of home interior, others are interested in the size of the cat house, others want to make the palace for the animal safer and more durable.
- Love for needlework is a great reason to make something for your pet. We are so rarely able to work with our hands with pleasure that some are specifically looking for a reason, and doing good to our beloved Murka is not the worst thing to do (otherwise, you can get to the swans from the tires).
If you doubt your abilities, then first try to make a very small house out of cardboard in order to evaluate the convenience and stability of the structure. Naturally, the miniature can be simply glued together - it is not necessary to make it soft and very beautiful.
Be sure to choose a place for the future housing of your fluffy. You may have to revise the design somewhat and adapt the pattern for yourself - as you know, cramped apartments are quite common.
Try not to use small items that the cat can tear off or chew off. My daughter seems to cat house it would have looked better if it had been decorated with beads and buttons, but unfortunately my mother's cat is not very smart.
What materials can be used
In the manufacture, you can use a variety of materials. I will describe all the elements of the product and tell you what materials these parts can be made of.sleeping area
There should be a rigid frame with a roof (if you are making a house) or without (if it is rather an open or partially open couch) and a soft bed. For the manufacture of the frame, you can use:
- wood;
- cardboard;
- plastic;
- light metal tubes;
- plywood and chipboard;
- textile.
- foam rubber;
- synthetic winterizer;
- straw;
- expanded polystyrene or other special granules.
From cardboard
The simplest version of the house that comes to the mind of absolutely all the owners of these animals is a cat house made of cardboard. If you have a cat, then you know how they love all kinds of bags, bags and boxes. Any packaging material is their favorite toy, which is the reason why many people make a cardboard cat house.See how to assemble such a house in just half an hour.
Pros:
- easily and quickly done;
- low costs;
- even a child will cope;
- like animals.
- quickly falls into disrepair;
- doesn't look very presentable.
Unpresentable appearance can be a problem for a person who is too scrupulous about his home. For example, my mother chooses textiles, only taking pieces of upholstery for furniture from home - so that the colors are in harmony, otherwise the tablecloths and napkins will look vulgar. Naturally, she would not like the cardboard house, but I was interested in making it, and it fit perfectly into the creative workshop of my close friend.
From newspaper tubes
See how you can make a cat house out of newspaper tubes. To be honest, I have not tried to make such a house with my own hands, but I know that newspaper tubes are often used to imitate straws. I can also note that the house made of newspaper tubes looks cute and at the same time reliable. It is better to make a lounger in such a house quite high, from foam rubber.This information (preparation of newspaper tubes) may also be useful to you:
How to twist newspaper tubes read in our article >>
How to weave from newspaper tubes for beginners, read in this article >>
soft house
Naturally, you can sew a house for a cat with your own hands. Copy the drawings, make patterns, and sew a cat house.The most interesting sewn house I saw was made in the form of a small tent - in its construction they used arcs for the frame, on which the fabric was stretched. As the "architect" said, a strong wire acted as a frame, and the fabric was taken from his old shirt - quite durable cotton, which was a pity to throw away because of the frayed sleeves.
And how to make a house for a cat in two minutes? Pull the t-shirt over the box and give out a soft bedding. On the video - instructions on how to make a house for a cat from a T-shirt and a disassembled hanger- it is used just as a frame.
You can make a house out of a T-shirt and more in a simple way- take a convenient box, remove the end element, and pull the T-shirt over the house so that the neck matches the missing end wall. Get a house with a round entrance. Quite convenient and at the same time simple.
A great way to make a cozy nest for your favorite murka - dump it in wet technique. Such houses look very unusual, but they are:
- warm;
- beautiful;
- completely natural;
- soft and safe.


In order to make housing for a cat with your own hands, you need to watch photos and videos carefully - you can’t do without photos alone. The built castle for the cat should also please the family - after all, cats are very sensitive to the moods in the house.
Are you afraid that you will not sew a house beautifully and neatly? I was afraid too, but then I found good way. You sew the house out of fabric, and mask all the seams with strips of faux fur. The pattern can be any, stripes of fur will help make the house neater.
By the way, do not forget - if we sew the house by hand, it is very important to check that all the needles and pins are left in the boxes, and not lost in soft matter, otherwise the cat can get hurt.

Combined design
But what if you make not a house for a cat with your own hands, but a huge play complex? Several floors, a sleeping area, a play area, walkways and hammocks... It sounds tempting, but it’s quite difficult to make such a cat house with your own hands - I advise those who have built any furniture at least once in their lives (at least a stool at school in the workplace).As a result, I made my mother just such a house and covered it with fluffy beige faux fur - it turned out no worse than in the store, but I had to ask friends for help, I myself could not cope with such a volume of work. Watch the master class, according to which I made a cat house with my own hands.
There are also such options for the game complex:


To make a scratching post or not
How to make a cat scratching post house with your own hands? Cats love to sharpen their claws anywhere, so it's important to provide them with the right place to do so - so the animal won't ruin your precious furniture, and at the same time it won't get hurt. To make a scratching post, you need a coil of rope and a solid board or a round pipe (you can take plastic sewer pipes (of course, clean and only from the store).Watch how your kitty sharpens her claws, and you will understand what kind of design she needs, vertical and horizontal, and then fix the future scratching post in the desired position and wrap it with a rope. I advise you to take a natural rope, it looks aesthetically pleasing even disheveled.
How to make a stationary scratching post for cats with your own hands? A small piece of pipe is wrapped with a jute rope and placed on a stand, a bag of sand is placed inside the pipe (for stability). See the option below, a scratching post with a nylon rope painted in bright colors.
Do you want to make an elegant house with a scratching post yourself? Install it instead of a roof - it looks adorable and cats love it.
Try to make do-it-yourself cat houses from boxes or fabric - after all, even a child will figure out how to build a house for a cat from improvised materials.